BLOOD CHURCH
making a simple shoot-em-up with FNA and MoonTools.ECS
if you find this tutorial valuable, i have a patreon and a ko-fi. your support is much appreciated.
NOTE: there has recently been an update to MoonTools.ECS that breaks many parts of this tutorial. I am currently in the process of rewriting the affected sections.
this is a tutorial on how to make a simple scrolling shoot-em-up using FNA and MoonTools.ECS. it is aimed at a broad audience. some familiarity with programming, particularly C#, is helpful, but not required.
if you don't know how to program at all, you might find this overwhelming at first, but i've written explanations with you in mind, so hopefully you can follow along still. i want this to be an extremely beginner friendly introduction for anyone who wants to learn how to make video games.
familiarity with computer graphics, game programming specifically, ECS, or custom engine techniques in general is NOT required.
if you're new to programming, i highly recommend that you type out all the code rather than just copying and pasting it. this sounds dumb but it really does help you internalize it better.
this tutorial also contains a lot of detail. a lot of other tutorials will oversimiplify and promote bad programming practices for the sake of simplicity, but i've tried not to do that. i want to show you here techniques you can use to make real video games, not just toy projects that will mislead you when you try to make your own games. there's no right way to do most things in programming, but there are certainly wrong ways, and i've tried to avoid them as much as possible.
click me!
this is an html <details> tag. i'm going to use these throughout the tutorial to answer questions you may have or provide additional details for the curious. if you have a question i don't answer, or are confused by something, let me know! i might just add an explanation to the tutorial behind one of these.
what's a game engine? how is it different from a framework?
these terms don't really have hard and fast definitions. some people would consider what we're doing to be making a custom engine. i think this is fair, but it also makes it sound much more intimidating and complicated than it really is. i prefer to think of us as making a video game, not a game engine. we're just doing it with a game framework, FNA, and some custom tools, instead of using a game engine.i heard someone say making a custom engine is a bad idea and you'll never finish a game if you make one.
this isn't a question but i'll answer it anyway.
when people hear "game engine," they mostly think of an extremely complex tool designed to provide as much of what you need to make a game as possible. these are things like unity, the unreal engine, and godot. therefore, when you hear "custom engine," you might assume that someone is trying to replicate the functionality of these engines, which have hundreds of developers who have worked for years or decades to make them, but all by themselves. and you'd rightly think that's really stupid!
the thing is, building a tool that does something complex that can work for everyone who could possibly want to use it is really hard. impossible, actually. which is why these engines like unreal, unity, and godot don't do that: they make assumptions about how you're going to want the tools to behave. sometimes they're right, but sometimes they're wrong, and you have to fight the program to get it to do what you want. sometimes they try to compensate for this by adding options, and this can help, but it increases the complexity of the tool, which makes it both harder to develop (leading to bugs) and harder to use (leading to frustration).
when we make custom tools, we're not trying to replicate all the functionality of unity or unreal. we're making exactly what we need. making a tool that suits the needs of everyone who could possibly want to use it is surprisingly hard, but making a tool that just suits the needs of your project can be surprisingly easy. this is why the golden rule of custom tech is this: you are not making an engine, you are making a game. an engine is nothing without a game. orient all the decisions you make about your engine around the specific game you are making.
for more information, i highly reccommend this post by tyler glaiel.
what is FNA?
FNA is a library (set of tools) for programming games. it's a re-implementation of another library called XNA, which was developed by microsoft in the mid 00s. microsoft stopped supporting XNA in 2010, and FNA lead developer ethan lee came along to reimplement the whole thing so games made with XNA could be ported to new systems and preserved.its status as a preservation project means that its API is extremely stable, but comes with the disadvantage of some compromises having to be made when supporting features that became possible only after XNA was abandoned.
i like it both because its stable API means you'll never download an update and find that it broke your game, and because it's a bit more "batteries included" than other options.
what is ECS?
ECS stands for Entity Component System. this is a software design pattern first created in 2007 for the game operation flashpoint: dragon rising. over the following 10+ years, people have discovered that it's actually really generally useful as an approach for programming games.to understand why ECS is valuable, it's helpful to consider what people did before ECS.
the most common way of programming games before ECS, and still a very common way today, is called the "actor model." this is the architecture used by unity, godot, and the unreal engine, among many, many others.
the goal of both of these programming architectures is to maximize code reuse. we don't want to write identical or nearly-identical code in a bunch of places in our project. it's more work, and it causes bugs.
the actor model attempts to achieve code re-use via a programming language feature called inheritance. you have a root class, usually called Actor, and everything in your game inherits from this class. inheritance allows sub-classes to use code from their parent class, which sounds pretty useful.
the problem comes because in video games, we often have objects that need to mix and match lots of behaviors from lots of different classes. it would often make sense to inherit from more than one parent class. what's wrong with this?
the main problem is called the "diamond problem". imagine four classes: A, B, C, and D. A inherits from B and C, and B and C inherit from D. B and C both override functionality in D. which overridden method is A supposed to use?
as a result of the diamond problem, and many other issues, many object oriented programming languages forbid multiple inheritance. or they have heavy restrictions to avoid these problems.
the result is that we have to use all sorts of awkward patterns to share code. helper functions, giant manager classes, and "tight coupling," which is when all your actors reference lots of other actors. when systems are very tightly coupled, changing the behavior of one class can easily result in unintentional changes in the behavior of other systems. if you've spent a long time making games in unity, unreal, or godot, you've seen this before.
ECS attempts to address this. if you've done a lot of object-oriented programming, you've probably heard the phrase "composition over inheritance." this is the idea that rather than using inheritance to code share, you should have a class hold references to other classes that implement the behavior it needs. ECS is, in a sense, this notion taken to its logical conclusion.
rather than actors, ECS has "entities." an entity is just an ID number, associated with a list of components. entities contain no logic.
a component is just data, associated with an entity. components also contain no logic, just data.
all the logic goes into systems, which use efficiently implemented filters to find entities with certain components. they can create entities, destroy entities, add components, modify components, and remove components.
it's difficult to explain the massive shift this causes in how you think about architecting games. rather than trying to explain it to you, it's better if i show you: look at the rest of this tutorial!
what is MoonTools.ECS?
MoonTools.ECS is an ECS library developed by evan hemsley for his game samurai gunn 2, influenced by more than a decade of commercial game programming experience.MoonTools.ECS implements all the important parts of ECS, with two additions. the common one is entity relations, which we will talk about later in the tutorial. lots of ECS libraries include relations, which are basically components that are associated with two entities instead of just one.
the uncommon feature which i think makes MoonTools.ECS extremely special is messages. i explain this later in the tutorial as well, but messages are stores of data like components that can be sent by systems and read by other systems. messages are destroyed at the end of every frame. this allows systems to easily communicate in a loosely coupled way, i.e. without directly referencing each other. messages solve a huge number of problems that come up with the ECS architecture, and substantially reduce overall awkwardness.
in general, the philosophy of MoonTools.ECS is that it is built for leisure, not for speed. it is fast, and evan has spent a lot of time making it as fast as it possibly can be, but the driving principle behind its design has always been ergonomics.
what's a shmup?
a shmup, shoot-'em-up, STG, or scrolling shooter is one of the oldest kinds of video games. these are 2D games where the screen scrolls vertically or horizontally and you control a player character (often a spaceship but sometimes other things) that shoots bullets to destroy enemies that shoot at you. these days the most popular subgenre is the bullet hell or danmaku shooter, which features extremely large amounts of enemy bullets on screen you have to dodge. check out blazing lazers, dodonpachi, or darius to get a sense of the kind of game we'll be making, but much worse than any of those.and one more word before we get started: programming is hard. making video games is hard. everyone finds it hard. if you find anything confusing, don't be afraid to ask for help, and don't feel like you're exceptionally stupid. we're all stupid, here, together.
i. getting set up
we're going to be using my FNAECSTemplate. if you know how development environments work, feel free to follow the instructions on that page. i use visual studio code and the template includes task files to let you automatically build with vscode, but it will also work with regular visual studio 2019 and other IDEs like jetbrains rider. all the important stuff is in the .csproj files.
what's git?
git is what's called a "version control system." the idea is that it stores versions of your software, called "commits" in git terminology, and lets you roll back to old versions if you mess up. it's extremely useful for programming. you can approximate this by saving a copy of your project every now and then, but that takes a lot of space and time. git makes this much faster by only storing the differences between versions using a special algorithm.git has its issues and can be very complicated to learn. most people struggle with it for a while before getting the hang of it. i'm using it not because i like it, but because it makes distributing software like this much easier. for the purposes of a tutorial like this, all you need to know is how to download git and a few basic commands. this isn't a git tutorial so i can't explain everything.
the only command you need to know to download the template is git clone. this will download whatever url you give it into whatever folder you give it.
the other command used in the instructions is git submodule update, which as you can imagine updates the git submodules. a submodule is a way of embedding one git repository in another. the template uses four submodules: ContentImporter, FNA, FontStashSharp, and MoonTools.ECS.
you can download git from the official website. if you're on windows, make sure you also install git bash.
what's git bash?
git is a command line program first and foremost. bash is a special kind of command line that originated on unix-like systems, and it has some nice features that the windows command line doesn't. you need bash to run the FNAECSTemplate setup script. git bash is the version of bash distributed with git for people on windows. you run it like any other program and then you can type things into it to run commands.how do i use the command line?
cd is the main command you need to know. that stands for "change directory." you can also type ls to see a list of all the files and directories in the directory you're currently looking at. you can use cd .. to go back up a directory level. you run setup.sh by typing ./setup.sh and hitting enter, nothing else required. every other command just requires typing exactly what the instructions say into the prompt.
take your time to poke around and read through the comments in the various example files that come with the template. it shouldn't take too long, and you should walk away with a good idea of the basic terminology we'll be using throughout this tutorial. if you want all the gory details about how i made this template, i wrote a whole separate article just about that.
i've called my project namespace ShmupTutorial throughout this tutorial. whenever you see that, or ProjectName, replace it with whatever you've called your project.
why are you using submodules and not nuget?
nuget is terrible, to the point where several of our dependencies (including FNA and MoonTools.ECS) do not distribute via nuget.the last thing you'll need is the assets i made. unzip this and put its contents in your Content folder.
ii. drawing to the screen
first, let's figure out how to draw a sprite on the screen.
sprite sheets
i used cram to make a spritesheet of the sprites we're going to use. it includes the sprites packed into a single png and a json file of metadata. if you want to use your own sprites, follow the instructions on the page for cram.
why not just load the sprites from individual files?
it's much more efficient for the GPU to access sprites that are all packed into a single sprite sheet. this is because texture switching is one of the least efficient operations a GPU can do. if it's just reading from rectangles on a single texture, that's a simple shift of the UV coordinates, which is much cheaper.the first thing we need is a way to read the sprite sheet data. FNA has inherited from XNA a built-in content management system that reads files compressed to the XNB format, but even chief FNA maintaner ethan lee thinks it's bad and you should not use it. it exists solely for backwards compatibility reasons and should be considered deprecated.
writing a content management system can be a little daunting and also quite boring. fortunately, i have written one for you. in the FNAECSTemplate lives a project called ContentImporter.
first, run
dotnet build .\ContentImporter\ContentImporter.csproj
from the command line in your project folder. now ContentImporter.exe should be built and ready to use at .\ContentImporter\bin\Debug\net7.0\ContentImporter.exe.
now you can run
.\ContentImporter\bin\Debug\net7.0\ContentImporter.exe .\ShmupTutorial\ShmupTutorial.csproj .\ShmupTutorial\Content\ .\ShmupTutorial\Content.cs
to import your content into a file called Content.cs. you'll have to re-run that command every time you add new content to the game.
help! i got an error about it not being able to find sprites.xnb or something like that!
you probably mistyped the above command to run the content importer. make absolutely sure that the paths are correct. you can look inContent.cs and see the calls to content.Load, make sure their paths don't include the Content folder name.
alternatively, if you're using visual studio, you can open ContentImporter.csproj and build it with the GUI build buttons. it will get built in the same location and you can run it the same way.
if you take a look inside our new Content.cs, you may see something that is dissimilar to how you're used to handling content in video games.
rather than storing content in some kind of data structure like a dictionary or adopting a complex serialization solution like Unity or Unreal, i've elected to build a system where all the content is stored in static readonly variables.
what's a variable?
variables are a little bit like the variables you learned about in math class. think of it like just giving a name to a value. you can also think of it like a box with a label on it that contains some data.what's a type?
a type is exactly what it sounds like. it restricts what types of data you can put in the box. down at the metal, it's all just ones and zeroes. type systems help prevent lots of errors caused by treating data in the wrong way. C# has what's called static typing, which means the type of a variable cannot change at runtime. C# has optional type inference with the `var` keyword, which i use extensively. this means the computer will figure out what type the variable is supposed to be for us and we don't have to care.C# comes with a lot of built-in types, but we can also define our own types with the class or struct keywords. we can then fill variables with instances of a type by using the new keyword.
what's a static variable?
static is a keyword in many programming langauges. it indicates that this variable is not tied to any particular instance of a class, but can be accessed by calling, in this case a variable like Textures.Sprites.
if the variable weren't static, it could only be referenced if we had a variable like Textures textures, by calling textures.Sprites.
this kind of variable is called a "constant," because it won't change as the program runs. C# has a const keyword for constant variables, but we can't use it here because that's for compile-time constants. these variables won't change as the program runs, but they have to be calculated when it launches because they'll change depending on where the program is being run from.
why do this? well typical solutions to content management are highly susceptible to runtime errors. if you're referencing files by their names with strings, and you delete a file or rename it, you can cause a runtime error if you forget to update all the code that references that variable. here, all errors are either compile-time errors or they happen immediately upon running the game (in the case where you forget to re-run the ContentImporter).
you can also take better advantage of your IDE's autocompletion functions with this method, because the language server knows about all the variable names. this solution also makes parallelizing content loading trivial.
the ContentImporter can handle sprite atlases, fonts, sound effects, and music. FNA also has support for video playback, but I haven't added support for that yet because it's a bit more complicated and I haven't personally needed it yet.
internally, the ContentImporter iterates over every file in your designated Content folder and generates code to load it. have a look at the code if you want, it's a bit messy but not too complicated.
the only thing other thing you have to remember to do is call AllContent.Initialize(Content); in your LoadContent method. the template includes a call to this method by default.
drawing components
let's start thinking about some ECS stuff. what entites and components do we need for drawing?
our player is definitely going to be an entity. what properties does the player have? for the purposes of drawing, they have a position on the screen, a rotation, a scale, and a sprite.
find Components.cs in the components folder and replace its contents with the following:
using Microsoft.Xna.Framework;

namespace ShmupTutorial.Components;

public readonly record struct Sprite(Rectangle Rect, float Depth);
public readonly record struct Position(Vector2 Value);
public readonly record struct Rotation(float Value);
public readonly record struct Scale(Vector2 Value);
C# 10 introduced a new type of struct, the record struct. these are perfect for components in ECS. you can see a deep dive here but the upshot for us is: they turn component struct declarations into one-liners. because they're one liners, it makes sense to put a bunch of component declarations in a single file.
what's a struct?
struct and class are two C# keywords used for defining new types of object. struct is short for "structure," and the term dates all the way back to the original C programming language. to understand the difference, you have to learn a couple of things about memory management.
in some languages, like C, you have to call a method (called malloc in C) to request memory from the operating system, and then you're responsible for calling another method (called free in C) to tell the operating system you're done with that memory and it can use it for something else. if you forget to do this, you cause a memory leak, which means your program will slowly take up more and more memory until the whole system crashes.
we don't have to worry about this in C#, because C# has a garbage collector. the garbage collector can detect memory that isn't being used anymore (called "garbage") and free it automatically. sounds great, right?
well, not so fast. garbage collection isn't free. it takes time and computing resources for the C# virtual machine to scan for garbage and collect it. in some applications, this doesn't really matter. but in games, we have at most 1/60th of a second to do all the calculations we need to display each frame. programmers call this "real-time computing." those garbage collection spikes can slow down the whole program so much that our framerate drops, which leads to a bad experience for the player.
there's a way out, though. in C#, types are all either managed or unmanaged. managed types have to be freed by the garbage collector, there's no other way. but unmanaged types can be automatically freed without having to use the garbage collector. this means that we can create and destroy as many unmanaged types as we want and there will never be any garbage collection!
entities and components are ECS objects that get created and destroyed a lot, so we want them to be unmanaged so we don't have to worry about garbage collection.
struct types are unmanaged by default, but can become managed if they contain any varibles of managed types. all class types are managed. strings are class types, so we can't put them in a struct without the whole thing becoming managed.
in MoonTools.ECS, entities and components are unmanaged struct types, while systems and manipulators are managed class types. this is because manipulators and systems are going to stick around for the lifetime of the program, so we don't have to worry about them being destroyed and creating garbage. you should always create all your class type instances as the program initializes and then re-use them over and over instead of destroying them.
we want our components to be readonly because even if they weren't, they're kind of not actually mutable. you have to call Set in order to update the component store, just modifying the struct won't do that. we'll get into that more later when we write our first system.
why not combine these into a single Transform component?
you can do that, if you want! i've come to prefer having the components separate, because in general these values will be modified by different systems. the system that moves things and handles collision will modify the Position struct, but the Rotation and Scale structs will probably be modified by unrelated systems related to animation and effects.
creating the player
in ProjectName.cs, replace the demo component creation logic with this:
var player = World.CreateEntity();
World.Set(player, new Sprite(Textures.Player, 0.0f));
World.Set(player, new Position(new Vector2(Window.ClientBounds.Width * 0.5f, Window.ClientBounds.Height * 0.5f)));
help! i'm getting an error about how the name "textures" does not exist in the current context!
this is probably because you haven't added the correctusing statement to the top of the file. C# makes you specify which namespaces and types you're going to need in each file. this is important for optimization, as well as preventing namespace collisions, when two types in different namespaces have the same name.
if you're using visual studio code or big boy visual studio, you can usually click on the error and then click on the little light bulb icon to get suggestions as to how to fix errors like this. there will often be an option to either add a using declaration, or specify the entire namespace to disambiguate when there's a namespace collision.
the player is an entity, and we Set two components on it: the Sprite and the Position.
why aren't we using the Scale and Rotation components?
i'll explain that in the next section. we're going to set some default values so we don't have to set the rotation or scale components on most sprites.
at this point, you can also delete the ExampleSystem.cs and its references in ProjectName.cs, as well as ExampleRenderer.cs and its references.
actual drawing
create a new file in Renderers called SpriteRenderer.cs.
using Microsoft.Xna.Framework;
using Microsoft.Xna.Framework.Graphics;
using MoonTools.ECS;
using ShmupTutorial.Components;
using System;

namespace ShmupTutorial.Renderers
{
    public class SpriteRenderer : Renderer
    {
        Filter SpriteFilter;
        SpriteBatch SpriteBatch;

        public SpriteRenderer(World world, SpriteBatch spriteBatch) : base(world)
        {
            SpriteBatch = spriteBatch;
            SpriteFilter = FilterBuilder
                .Include<Position>()
                .Include<Sprite>()
                .Build();
        }

        public void Draw()
        {
            SpriteBatch.Begin(
                SpriteSortMode.BackToFront,
                BlendState.AlphaBlend,
                SamplerState.PointClamp,
                DepthStencilState.None,
                RasterizerState.CullCounterClockwise
            );
            foreach (var entity in SpriteFilter.Entities)
            {
                var position = Get<Position>(entity).Value;
                var rotation = Has<Rotation>(entity) ? Get<Rotation>(entity).Value : 0.0f;
                var scale = Has<Scale>(entity) ? Get<Scale>(entity).Value : Vector2.One;
                var sprite = Get<Sprite>(entity);
                SpriteBatch.Draw(
                    Content.Textures.Sprites,
                    new Vector2((int)position.X, (int)position.Y),
                    sprite.Rect,
                    Color.White,
                    rotation,
                    new Vector2(MathF.Floor(sprite.Rect.Width * 0.5f), MathF.Floor(sprite.Rect.Height * 0.5f)),
                    scale,
                    SpriteEffects.None,
                    sprite.Depth
                );
            }
            SpriteBatch.End();
        }
    }
}
let's go through this!
a Filter is an ECS construct which you can think of as a list of all the entities that fulfill certain criteria. we have Include, which means to include only entities who have these components, and we also have Exclude which means don't include entities with this component. you may be used to operations like this in unity being very very slow, but because of the way an ECS stores components, this is a very fast operation and we can easily do it once per frame.
a SpriteBatch is how you draw to the screen with FNA. it takes all your sprites that you want to draw and packs them into a single vertex buffer so the GPU can draw them all with a single draw call. this is much more efficient than drawing each sprite one at a time. If you're using the template, there's code to create a SpriteBatch by default in LoadContent, which we dependency inject into our render via the constructor. dependency injection is a very common pattern with MoonTools.ECS.
what's a vertex buffer?
a vertex buffer is a way data gets sent to the GPU. it stores a list of vertices with some additional attached data like texture coordinates. sending data to the gpu is very slow, so you want to send as few very large buffers as you can, rather than sending a bunch of small buffers.what's all this public void Draw() stuff?
that's a method, also known as a function, procedure, or subroutine. public is the access control specifier, it means you can access this method from anywhere, including outside the class. void is the return type. in some methods, this specifies the type of value the method will provide as output, like int or bool. in this case, the type is void, which means this method doesn't return anything. Draw is the name of the method. () is, in this case, just a bit of syntax we have to put to indicate that this is a method that takes no arguments. in other methods there would be variable declarations between those parentheses, which would be the required inputs to the method.
what's a constructor?
a constructor is a special type of function that is run when we create new instances of a type with thenew keyword. you can tell a method is a constructor because it has no return type.
always draw as many sprites as possible in a single sprite batch. if you need to use multiple sprite batches (for shader-related reasons), draw every single sprite that uses the same shader in a single batch instead of switching back and forth, and use the depth buffer if you need sprites using different shaders to occlude each other. this is not covered in this tutorial, but i will cover it at some point.
in our Draw method, we first have to Begin the sprite batch. we call this method with a bunch of options.
a note on BackToFront sorting
we're using BackToFront sorting here for simplicity, but it's pretty slow. a better idea would be to have sprite layer components and use those to draw them in the right order using the Deferred sort mode.
what are those options?
SpriteSortMode is how the sprites are going to be sorted. you have to care about this if you're going to be layering foreground sprites on top of background sprites. Deferred means that it will draw them in whatever order we tell it to, so sprites that we call Draw later for will be drawn on top of sprites we call Draw for earlier. we're using BacktoFront, which means sprites with higher depth values will get drawn on top of sprites that have lower depth values. this will let us precisely control things like, for instance, making sure bullet sprites don't render on top of the player sprite, or making sure that the player and enemies render on top of the background. never use Immediate for any reason, it makes each sprite its own draw call which is awful for performance and completely unnecessary.
BlendState is basically how the sprite batch will handle transparency. AlphaBlend works similarly to the basic blend mode in graphics programs like photoshop, using a fourth color channel called Alpha to determine how much a sprite occludes things behind it. other options include Additive, which will sum the colors of overlapping pixels, and Opaque, which will always cover "further back" pixels with "further forward" pixels. we're using AlphaBlend because our sprites include alpha information. for a brief, thorough explanation of the difference between AlphaBlend and NonPremultiplied, consult this video from Captain Disillusion.
SamplerState is about the texture sampling method the GPU will use. for pixel art, you always want to use PointClamp or PointWrap. texture sampling algorithms answer the question of what to do with screen pixels ("fragments") that don't neatly line up with texture pixels ("texels"). Point means that it will just choose the color of the closest texel. Clamp and Wrap refer to the behavior when the UV coordinates are outside of the range (0, 1). Clamp will treat anything greater than 1 as being equal to 1 and anything less than 0 as being equal to 0. Wrap will treat a UV coordinate value of 1.5 or 2.5 as being 0.5, "wrapping" the value around to the other side. for our purposes this does not really matter. other options, like Linear and Anisotropic use mathematical functions to guess what the color "in between" the pixels would be if the image was higher resolution. this can result in higher image quality on high resolution textures.
DepthStencilState is related to how the SpriteBatch will draw sprites "on top of" other sprites. this is a little beyond the scope of this tutorial, but you can use this along with another special texture called the "depth buffer" to let the SpriteBatch know areas of the screen where it doesn't have to bother drawing pixels because they're going to be covered up by something else. we're not using this, so we set None.
RasterizerState is related to something called backface culling. i may blow your mind with this: there's no such thing as a 2D game anymore. it's all 3D as far as the GPU is concerned. see, your GPU only knows how to understand vertices, triangles, textures, and texture coordinates. it doesn't know what a "sprite" even is. what SpriteBatch is doing, as i hinted at earlier, is actually constructing a bunch of flat rectangles in 3D space with your sprites as textures on them. We don't have to draw the back sides of these rectangles, because they're facing away from us. this tells a part of the renderer called the rasterizer which direction our triangles are wound so it knows which side is the front and which side is the back. our sprite batch is going to output triangles wound clockwise, so we want to cull counter-clockwise triangles.
this is again a little beyond the scope of this tutorial again but basically: the GPU only understands triangles. a rectangle (called a "quad" in computer graphics jargon) is two triangles touching each other, like if you drew a diagonal line splitting a rectangle in half. each triangle therefore shares some vertices at the corners where that diagonal line meets the corners of the rectangle. rather than sending six vertices, four of which are duplicated, we instead only send four, and use something called an index buffer to tell the GPU which vertices we mean using a number instead of the whole vertex. when we do this, we specify the vertices of a triangle with increasing numbers in either clockwise or counter-clockwise order. it doesn't matter as long as we're consistent. that clockwiseness or counter-clockwiseness is the winding of our triangles.
then, we have a foreach loop where we iterate over every sprite in our game using the filter. for each one, we get its transform and sprite. then, we call SpriteBatch.Draw with a bunch of parameters:
- the sprite sheet texture we created earlier
- the sprite's position we just got, which we round to the nearest integer to avoid some visual glitches
- the sprite rectangle we stored earlier
- the sprite color (white for now, later we can add the ability to tint the sprite if we want)
- the sprite's rotation we also just got
- the sprite origin. FNA by default has the origin in the top left corner, but we want it in the center of the sprite.
- the sprite's scale
- the sprite effect
- the layer depth
what's the deal with the sprite effects?
this is not really related to the "dogshit ass shader system" i referred to in my blog post about custom engines. i cannot explain that in full here, but this is... not the same thing even though it's called almost exactly the same thing. the way shaders work is by passing anEffect into SpriteBatch.Begin. this is... just a weird enum for flipping the sprite horizontally or vertically. which, like, whatever.
what's that question mark we use while getting the rotation and scale?
the question mark is called a "ternary operator." it's a sort of compact one-line if statement that's present in a lot of programming languages. essentially, it's condition ? if true : if false so if the expression to the left of the ? is true, the whole thing evaluates to the value between the ? and the :. otherwise, it evaluates to the thing after the :.
i use this pattern a lot to create default values for entities that may or may not have a component. our filter only specifies that we need a Position, not a Rotation or Scale. that's because if an entity doesn't have those components, we can assume a sensible default value for them (namely, no rotation and unit scale). the majority of sprites we create won't be rotated or scaled at all, so this allows us to have those options without having to attach rotation and scale components to every sprite.
then, we call SpriteBatch.End once we've drawn all our sprites, which causes SpriteBatch to wrap up the batching process and actually draw everything to the screen.
finishing up
now, create the SpriteRenderer in ProjectName.cs and initialize it:
SpriteRenderer SpriteRenderer;

(Later, in LoadContent...)

/*
RENDERERS
*/

SpriteRenderer = new SpriteRenderer(World, SpriteBatch);
protected override void Draw(GameTime gameTime)
{
	GraphicsDevice.Clear(Color.Black);
	SpriteRenderer.Draw();
	base.Draw(gameTime);
}
and run the game:

....huh.
that's a little small, isn't it? the problem is that our window is, if you left the template settings at default, 1024x768, and a little 13x15 sprite is just not very large compared to that.
this also subtly reveals an even bigger problem. if the user changes the game's resolution, everything's going to stay the same size! someone playing in full screen on a 4k monitor would see absolutely miniscule sprites if we made our game like this.
you could adjust the scale factor until it looks better, but that's not going to be pixel-perfect and it's hard to make that work for a wide variety of different screen sizes. what we need is a render target.
render targets
a render target is a texture that you can draw to instead of drawing to the screen. we can draw to a render target that's the size of our desired rendering resolution, and then upscale it to the full window size.
first, let's create some variables at the top of ProjectName.cs:
public static readonly int RenderWidth = 320;
public static readonly int RenderHeight = 240;
public static RenderTarget2D RenderTarget;
a modest 320x240, a good size for our game's sprites. you can adjust this if you drew your own sprites earlier at a different resolution.
then, near the top of LoadContent:
RenderTarget = new RenderTarget2D(GraphicsDevice, RenderWidth, RenderHeight);
we have to adjust the player's spawn position too:
World.Set(player, new Position(new Vector2(RenderWidth * 0.5f, RenderHeight * 0.5f)));
now replace your old Draw loop code with:
protected override void Draw(GameTime gameTime)
{
	GraphicsDevice.SetRenderTarget(RenderTarget);

	GraphicsDevice.Clear(Color.Black);
	SpriteRenderer.Draw();

	GraphicsDevice.SetRenderTarget(null);
	GraphicsDevice.Clear(Color.Black);
	SpriteBatch.Begin(
		SpriteSortMode.Deferred,
		BlendState.Opaque,
		SamplerState.PointClamp,
		DepthStencilState.None,
		RasterizerState.CullCounterClockwise,
	);
	SpriteBatch.Draw(
		RenderTarget,
		new Rectangle(
			0,
			0,
			Window.ClientBounds.Width,
			Window.ClientBounds.Height),
		null,
		Color.White
	);
	SpriteBatch.End();

	base.Draw(gameTime);
}
first we use SetRenderTarget to make the graphics device draw to our render target instead of the window, and use Clear to clear the render target. then we call our SpriteRenderer.Draw like before.
now we use SetRenderTarget(null) to start drawing to the window again, clear it, and use the SpriteBatch and SpriteBatch.Draw just like before, only now instead of the spritesheet we're drawing the RenderTarget, and we're using a new overload of SpriteBatch.Draw that allows us to specify a rectangular region of the target buffer to draw to. we specify the whole screen, and it will scale our RenderTarget to fit.
some notes on the technical details of drawing to the window
technically we don't draw directly to the *window*. we draw to what's called a "back buffer" or "swap chain". these are special render textures that are the same size as the window. you have three things: the pixels currently being shown on the monitor, the back buffer we're writing to, and a finished back buffer. when the GPU wants to send a new frame to the monitor, it grabs the completed back buffer we're *not* writing to. when we're done rendering a frame, it becomes the new completed back buffer and we clear the old one. this can help prevent screen tearing, though screen tearing is still possible with a swap chain depending on a few other aspects of how the buffer is drawn to the screen.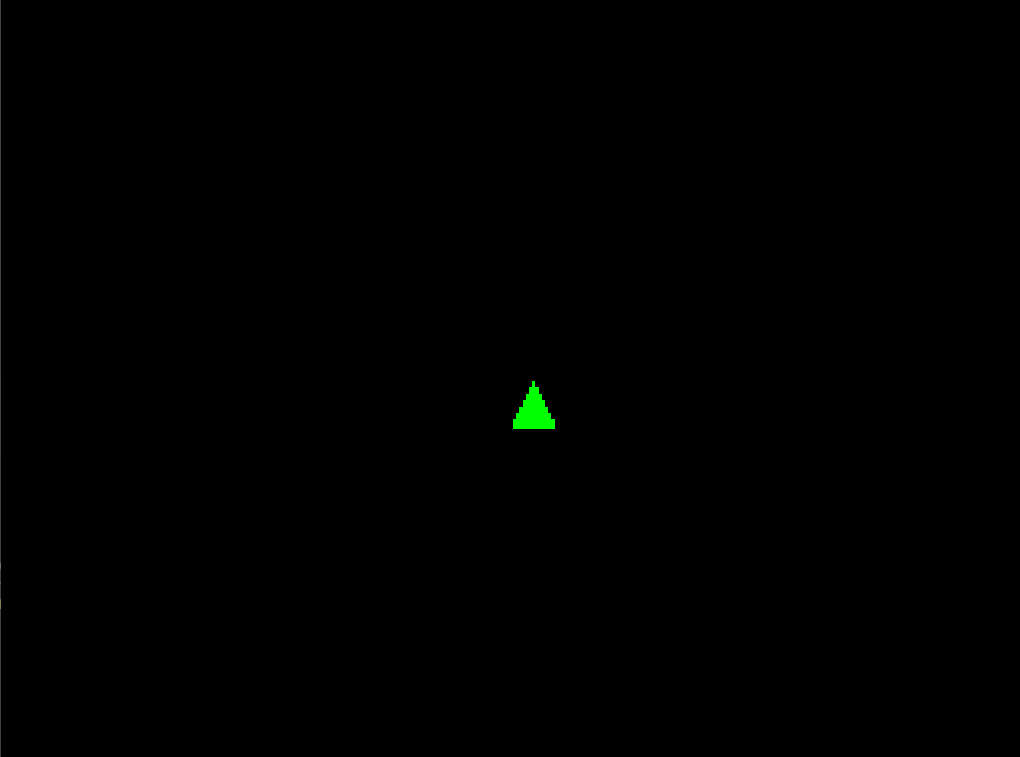
this is much better! but there's a problem lurking. imagine if we changed the resolution to one that isn't the same aspect ratio as our render target, say, 1280x720.
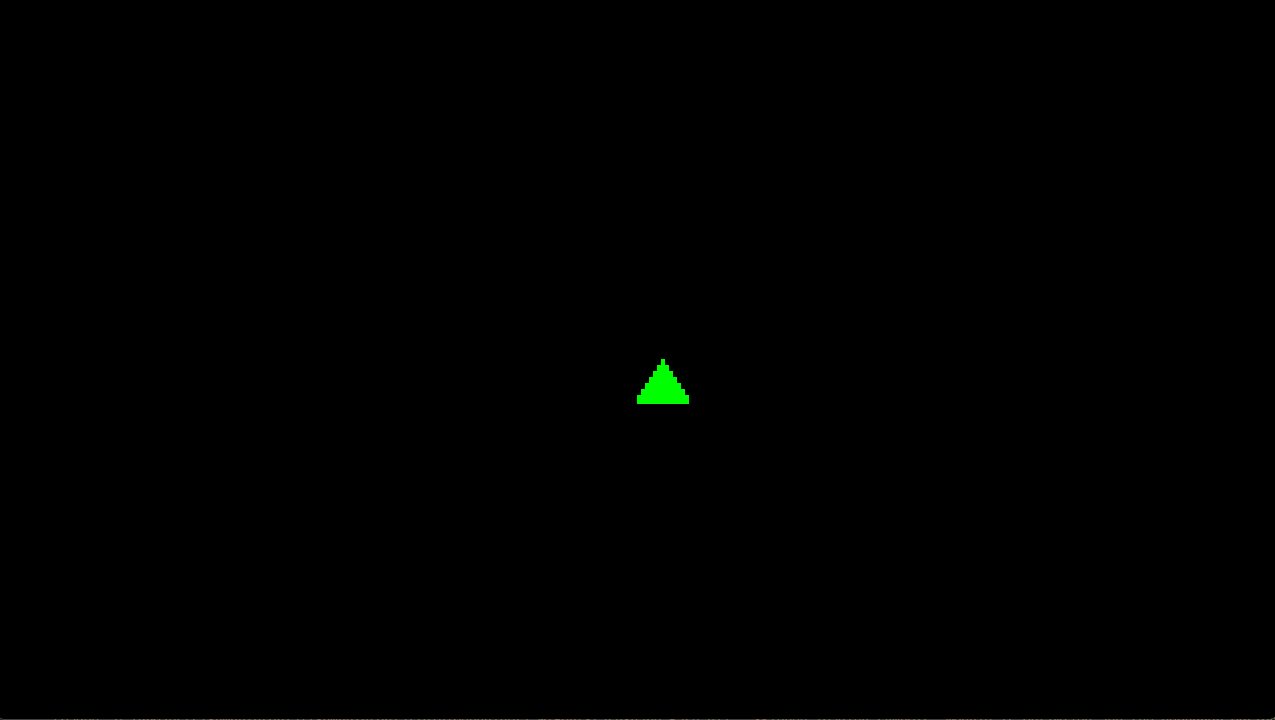
ye gods! my boy! he's been stretched horizontally! that's extremely bad.
we don't want our render target to stretch to fill the whole window. we want it scaled up in a way that preserves aspect ratio, even if that means letterboxing. and for a pixel art game we may want to go further, specifying that we only want to scale to integer multiples of our render resolution so everything looks nice and crisp.
first, create another variable at the top of ProjectName.cs:
public static readonly float AspectRatio = (float)RenderWidth / RenderHeight;
now, in Draw, instead of using ClientBounds directly:
SpriteBatch.Begin(
                SpriteSortMode.Deferred,
                BlendState.Opaque,
                SamplerState.PointClamp,
                DepthStencilState.None,
                RasterizerState.CullCounterClockwise
            );

var height = Window.ClientBounds.Height;
height -= (height % RenderHeight);
var width = (int)MathF.Floor(height * AspectRatio);
var wDiff = Window.ClientBounds.Width - width;
var hDiff = Window.ClientBounds.Height - height;

SpriteBatch.Draw(
	RenderTarget,
	new Rectangle(
		(int)MathF.Floor(wDiff * 0.5f),
		(int)MathF.Floor(hDiff * 0.5f),
		width,
		height),
	null,
	Color.White
);

SpriteBatch.End();
get the height, and use the modulo operator to round it down to the nearest integer multiple of RenderHeight. leave this step out if you don't care.
then, instead of getting the width of the window, calculate the correct width using the AspectRatio.
next, we need to get the difference between the window width and height and our calculated width and height. now we use those to calculate the X and Y offset for the render target so it draws centered, and we pass in the calculated width and height instead of the renderer width and height.
here's the end result, shown at a resolution of 1600x900 with the background color set to CornflowerBlue so you can clearly see the letterboxing.
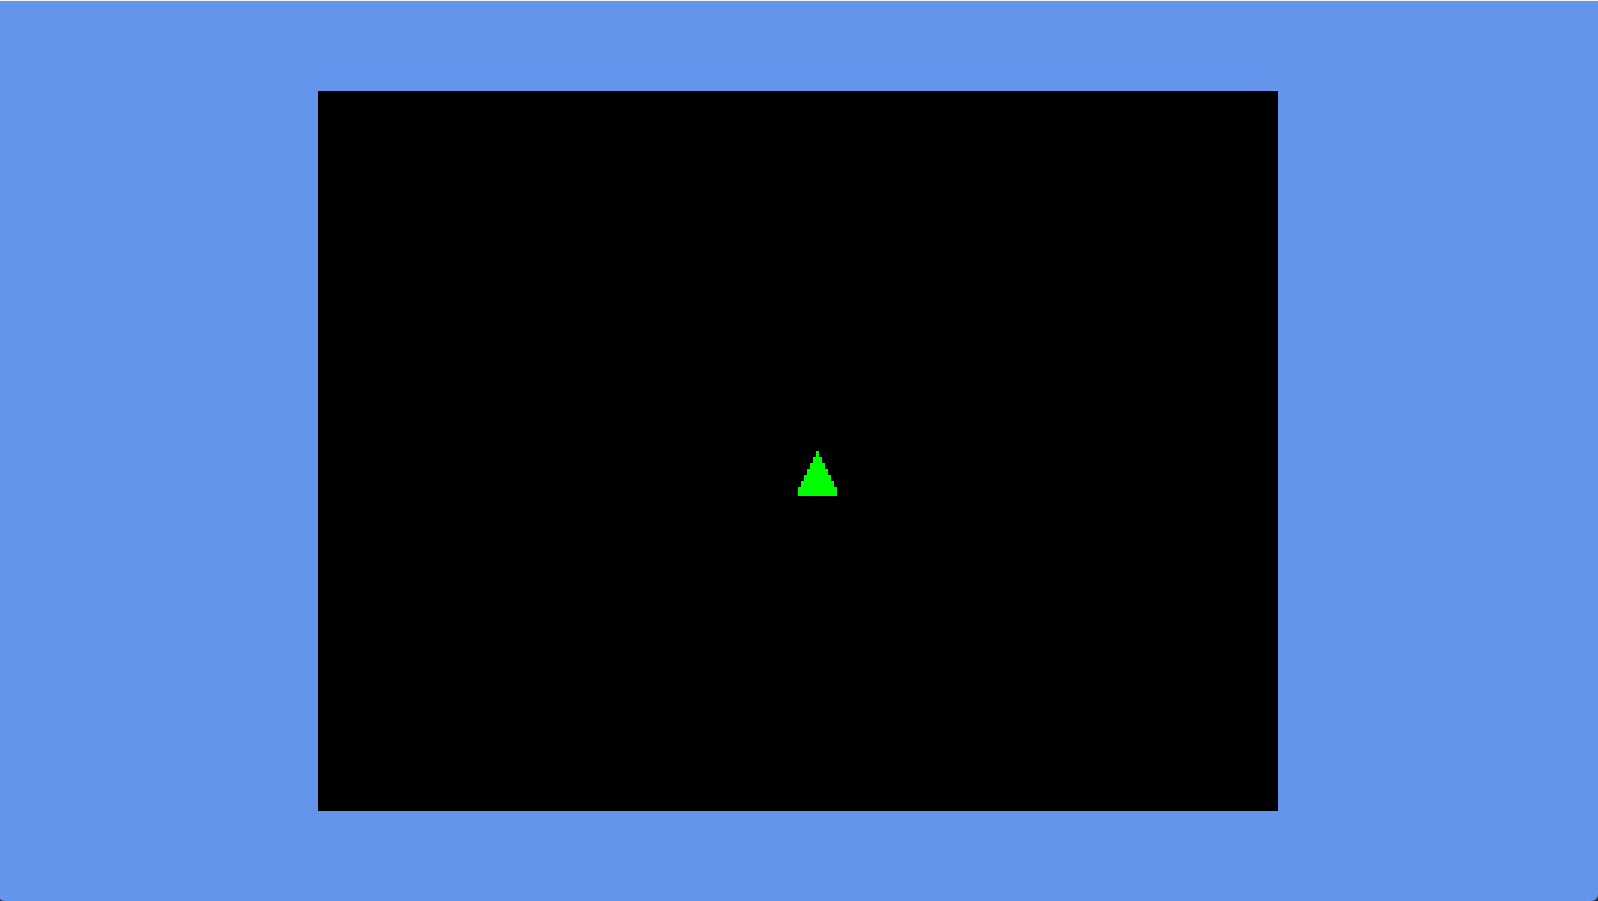
cool!
so now we have a nice rendering setup. i had to explain a lot so it took a while to get here, but i hope you'll agree it wasn't too bad. the whole renderer part is only ~50 lines of code.
if you compare this to the examples from other frameworks like love2d, however, this might seem extremely complicated. after all, love2d promises you can just do this:
function love.load()
	whale = love.graphics.newImage("whale.png")
end

function love.draw()
	love.graphics.draw(whale, 300, 200)
end
and you can do that, and it will work, but we haven't just put a triangle (or a whale) on the screen. we've created an entire structure on which we can build the rest of our game. the love2d example doesn't include sprite batching or texture atlasing, it isn't set up to draw more than one sprite, and it isn't ready to move the sprite around; the sprite just sits at one spot on the screen. you can do all of these things with love2d, but a robust system usable in a real game would look a lot like what we just did.
another massive benefit of this structure is how cleanly it separates rendering from game logic. speaking of which, let's add some gameplay!
iii. movement
the first step to gameplay is to be able to push buttons and move the player around. this may seem straightforward, but there's some considerations we have to make.
let's take a look at the big picture of how some of our systems will connect:
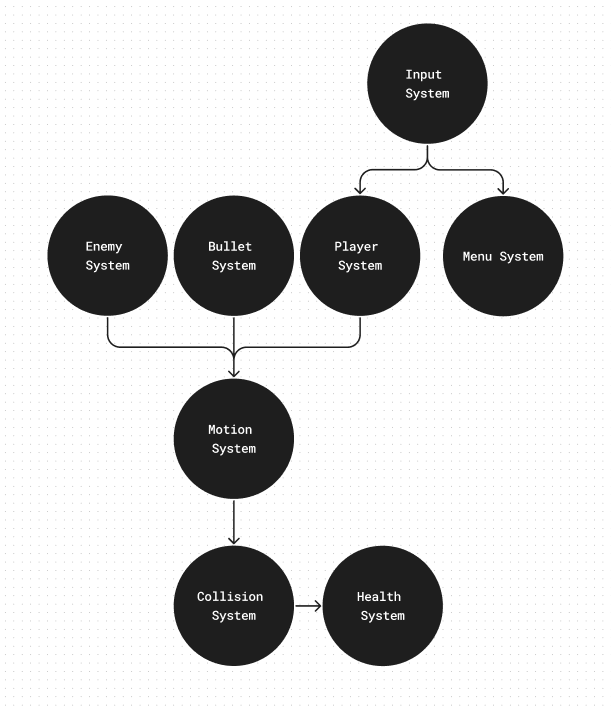
the (M)ECS system architecture is almost like a tree. at the start is our input system. we need a whole separate system for this so that we can use it to drive both in-game elements (player movement) and out of game elements (the menus). the input system will primarily be responsible for taking the concrete stream of discrete input events coming from FNA and turning them into abstracted actions like "move left" or "shoot." this will allow us to have multiple buttons bound to the same control, and in general is necessary for making controls rebindable by the player.
the player system takes these abstracted actions from the input system and turns them into instructions for the other systems: spawn a bullet, move the player entity by this much. the enemy system and bullet system are very similar, but instead of taking input they just make decisions on their own. having a separate bullet system allows us to do very shmup-like things of having bullets that change their velocity after being fired, for instance to move in a sinusoidal pattern.
the motion system takes input from everything that wants to move. it's responsible not only for moving everything, but also for checking collision to make sure that a requested movement is possible, and adjusting the trajectories to keep colliders from overlapping.
when collisions do happen, the motion system sends a message to the collision system, which uses the information about which entities have collided to determine what to do next, and sends messages to the appropriate system.
here we only have the health system, which adjusts how much health entities have and destroys them if they run out. but you can imagine this collision system sending messages to a lot of other places:
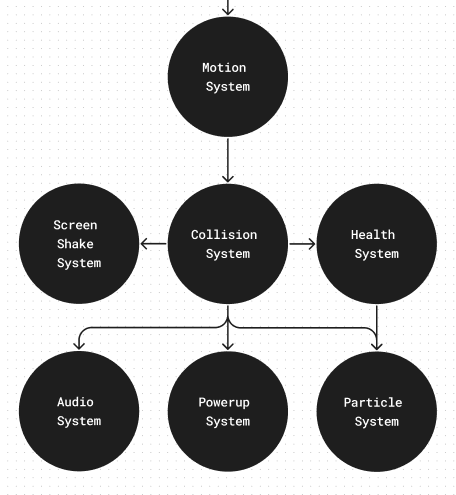
when two objects collide, those two objects might deal damage to each other, spawn hit particles, shake the screen, cause a sound effect to play, cause the player to pick up an item or powerup, or any number of other things, and this is just considering what might happen in a shmup. here is a powerful rule of thumb:
action games are, in general, a complex set of rules for what happens when things touch other things.
getting this part right is very important because it's the core of the gameplay.
what about callbacks?
many game engines use callbacks to implement collision, but this is a terrible idea. callbacks make it hard to reason about cause and effect. everything that could possibly happen when two objects touch is all scattered across a bunch of different objects. this leads to unexpected bugs and duplicated code. *fundamentally*, a player moving and an enemy moving are *the same thing*, so they shouldn't be handled by separate bits of code. a player taking damage and an enemy taking damage are also *the same thing*, so they shouldn't be handled by separate bits of code. we can keep all the code that is the same the same, with small conditional cases for the things that have to be different.what about inheritance?
this is better than the object-oriented approach to code reuse, inheritance, because it gives us *much* more control over *exactly* what parts of the code are reused and which parts need special cases. even in object-oriented codebases, you may have heard the phrase "composition over inheritance:" this is that, taken to its logical extreme.let's write some code
first, let's handle the input. this is a rabbit hole of a subject. much like correct content importing, correct input handling is very dull and complicated.
so, just like with content, i have included with the FNAECSTemplate a default system for handling input. this is based on the real way i handle input in my game DREAM SLAYER.
this consists of two files: Input.cs and InputHelper.cs. InputHelper.cs is a file i generated using a python script. the goal of InputHelper.cs is to allow you to treat all three types of FNA input (gamepad, mouse, and keyboard) as just input, without having to worry about exactly what device produced the input.
to accomplish this, every input is represented as a value between 0 and 1 or between -1 and 1. this is because, for instance, in a first-person shooter, a player playing with mouse and keyboard will probably bind "shoot" to the left mouse button (a boolean input), while a player playing with a controller might bind shoot to the right trigger (an analog input). our generic inputs have to represent the most flexible input type.
the upshot is this: if you go into Input.cs, you should find an enum like this:
public enum Actions
{
	ExampleAction
}
we can replace this with the actions our game has:
public enum Actions
{
    MoveX, MoveY, Shoot
}
and then, a little further down in the ResetActions method, set default bindings for these actions:
public static void ResetActions()
{
	ActionBindings = new Dictionary<Actions, GenericAxis>()
	{
		{Actions.MoveX, new GenericAxis{
			Positive = new HashSet<GenericInputs>(){GenericInputs.Right, GenericInputs.D, GenericInputs.DPadRight, GenericInputs.LeftX},
			Negative = new HashSet<GenericInputs>(){GenericInputs.Left, GenericInputs.A, GenericInputs.DPadLeft}
		}},
		{Actions.MoveY, new GenericAxis{
			Negative = new HashSet<GenericInputs>(){GenericInputs.Up, GenericInputs.W, GenericInputs.DPadUp, GenericInputs.LeftY},
			Positive = new HashSet<GenericInputs>(){GenericInputs.Down, GenericInputs.S, GenericInputs.DPadDown}
		}},
		{Actions.Shoot, new GenericAxis{
			Positive = new HashSet<GenericInputs>(){GenericInputs.Space, GenericInputs.AButton}
		}}
	};
}
what's an enum?
you can think of an enum as a way of giving friendly, human-readable, meaningful names to numbers. they allow us to represent a fixed set of discrete possible values using names instead of hard to read integer constants.
what's a Dictionary?
a dictionary is an unordered collection of key value pairs. it's like an array, only instead of each value getting an index number, it gets a key, which can be anything. this lets us arbitrarily associate one thing with something else, which is why they're also sometimes called "associative arrays."
what's up with this angle bracket syntax like <Actions, GenericAxis>?
these are a feature of C# called generics. generics solve a problem in statically typed languages: i want this Dictionary to be able to hold any type of variable, but i also want it to be type-safe. by that i mean that i should be able to specify ahead of time which types i want to be able to go into this collection, and the compiler should warn me if i try to put something else in there.
the angle bracket syntax means that the keys of this dictionary are going to be of type Actions, and the values are going to be of type GenericAxis.
what's a HashSet?
a HashSet is a C# data structure that functions as a "set," which is a data structure that contains only one of each thing in it. so if you had a HashSet of integers, {0, 1} would be valid contents, but {1, 1} would not be. in this way, you can think of a HashSet as like a list, but it doesn't store duplicates. if you try to put a duplicate in, it will just not do anything. we use a HashSet because it doesn't make any sense to have the same input bound to the same action multiple times.
why is up negative and down positive? shouldn't it be the other way around?
this is counterintuitive at first, but FNA, and every other 2D game framework i know of, puts (0, 0) in the top left corner of the window, with the Y value increasing as you go down and the X value increasing as you go right. this makes certain kinds of math easier, especially when you're writing user interface code.this system does not include a prefab way of rebinding controls, because that is dependent on your user interface system. however, this system makes it much easier to rebind controls than every other method i've tried. rebindable controls are important, and you should endeavor to allow players to rebind controls with as much freedom as possible in your game. i'll probably write a separate tutorial just about how you might go about doing this.
anyway, when the Input system detects input for one of your actions, it sends an InputAction message. this message includes three pieces of information: the axis value, the action in question, and the action state (which, for these messages, will always be either pressed, held, or released).
what's a message?
messaging is the biggest feature MoonTools.ECS adds to the ECS formula. it's a variation on the common publish-subscribe pattern. essentially, systems can use Send to send any unmanaged value as a message, which can then be read (with a variety of methods) by any system called after it.
messages are destroyed at the end of every frame. otherwise, they're just like components: they store only data. you can send a message attached to an entity as well, which we'll see in a bit.
the advantage of this approach is that systems don't have to care about who is receiving their messages, or who the messages they receive are from. this is something software people call "loose coupling." none of the systems has to store a reference to any other system to communicate with it. this means we can, for instance, remove a system entirely and the game will not crash.
the player
first, let's go back to Components.cs and add a few more:
public readonly record struct CanBeControlled();
public readonly record struct CanMove(float Speed);
this is where i'm going to introduce a rule of thumb for components: think of them as things an entity can do. sometimes this naming scheme is a little cumbersome, but you could think of a Sprite as a CanBeDrawn component, for instance. MoonTools.ECS developer evan hemsley refers to this as the "fruits principle," after matthew 7:16:
You will know them by their fruits. Are grapes gathered from thorns or figs from thistles?
(i just wanted to put that in there because i think it's very funny to talk about the bible in a tutorial about programming.)
in ECS, we don't care what an entity is. an entity by itself isn't really anything! it's just an ID number. we identify entities entirely by what components they have, using filters.
this may seem very abstract right now, but as we follow this principle it will hopefully become more clear. understanding this is key to writing good ECS code.
while we're at it, update create a new message in Messages.cs:
using Microsoft.Xna.Framework;

namespace ShmupTutorial.Messages;

public readonly record struct Move(Vector2 Delta);
let's put this into practice. create a new file in the Systems folder called Player.cs:
using System;
using MoonTools.ECS;
using ShmupTutorial.Components;
using ShmupTutorial.Messages;
using Microsoft.Xna.Framework;
using ShmupTutorial.Data;

namespace ShmupTutorial.Systems;

public class Player : MoonTools.ECS.System
{

    public Player(World world) : base(world)
    {
    }

    public override void Update(TimeSpan delta)
    {

    }
}
let's fill in our update loop:
public override void Update(TimeSpan delta)
{
    if (!Some<CanBeControlled>())
        return;

    var player = GetSingletonEntity<CanBeControlled>();

	var movement = Vector2.Zero;

    foreach (var input in ReadMessages<InputAction>())
    {
        if (input.State == ActionState.Pressed || input.State == ActionState.Held)
        {
            switch (input.Action)
            {
                case Actions.MoveX:
                    movement += Vector2.UnitX * input.Value;
                    break;
                case Actions.MoveY:
                    movement += Vector2.UnitY * input.Value;
                    break;
                default:
                    break;
            }
        }
    }

    movement.Normalize();

    if (movement.LengthSquared() > 0.0f)
    {
        Send(player, new Move(movement));
    }
}
what's switch?
a switch statement is a lot like an if statement. instead of having to write individual if statements for each possible value of the enum, we can cover all the possible values with cases and then throw away values we don't care about with default.
first, we have a little guard to make sure that if the player doesn't exist, the Player system early returns and doesn't run. this will obviously never be the case now, but in the future the player will be able to die, so we need to be sure.
the Some method is useful for more than just avoiding a runtime error. for instance, it's common to implement pausing by just creating an entity with a Paused component, and having every system that needs to pause early return if that component exists.
there's only ever one player, so we can just use the GetSingletonEntity method to get it without having to bother with a filter.
our player has four directional buttons they can press, but we can also move diagonally by pushing two buttons at once. we'll store our movement delta in this variable called movement. also note that because we're multiplying by the input value, this will smoothly handle analog movement on analog sticks (i.e. pressing the stick only partially in a direction).
we use ReadMessages<InputAction> to iterate over every action message. this method returns every message sent this frame before this Update loop was called. we check also to make sure that we only care about inputs that are Held or Pressed.
we use a switch statement on this enum to handle all the possible inputs. we don't care about Shoot right now so we can just ignore it with the default case.
what's up with the normalization?
imagine you push down and right at the same time. this adds 1 to the Y axis and 1 to the right axis. now consider if you just pushed down: it just adds 1 to the Y axis. the speed we're moving at is determined by the length of the vector. in the second case, the length is 1, but in the first case, the length is sqrt(1^2 + 1^2) == sqrt(2) == ~1.41. ~1.41 is bigger than 1, so moving diagonally will move you faster than moving orthogonally. we normalize this to retain the diagonal direction but adjust the vector length so it's always 1.
finally, we check if the player is trying to move this frame and if it is, send a Move message. we're not concerned about speed or delta time correction here, we'll do that in the Motion system.
why LengthSquared?
all we care about is if the vector length is non-zero. in that case, we can use LengthSquared instead of Length because if Length is zero LengthSquared is also zero.
we'd do this because the formula for vector length is sqrt(x^2 + y^2). there's no reason to take the square root when we don't have to, so we can use x^2 + y^2 instead, which gives us the square of the length.
it's not just that the second operation is simpler, it's also specifically that it is avoiding a square root. square roots are much slower than addition and multiplication (and exponentiation), because they involve complex floating point approximation algorithms. go ahead and take a look at the wikipedia article "methods of computing square roots". really luxuriate in it. it's a mess.
this is also true of division, by the way, though less bad. this is why you'll always see me write code like x * 0.5f instead of x/2.0f whenever i can. it's actually faster.
also, while we're here, let's move the player spawning code into the player system. remove the spawning logic from ProjectName.cs and put it here, in Player.cs
public override void Update(TimeSpan delta)
{
	if (!Some<CanBeControlled>())
	{
		var entity = CreateEntity();
		Set(entity, new Sprite(Content.Textures.Player, 0.0f));
		Set(entity, new Position(new Vector2(ShmupTutorial.RenderWidth * 0.5f, ShmupTutorial.RenderHeight * 0.5f)));
		Set(entity, new CanBeControlled());
		Set(entity, new CanMove(128.0f));
	}
now if there's no player, the player system will spawn one. we'll change this as we go on.
bringing it all together: the motion system
create a new file called Motion.cs in the Systems folder.
using System;
using MoonTools.ECS;
using ShmupTutorial.Components;
using ShmupTutorial.Messages;
using Microsoft.Xna.Framework;
using ShmupTutorial.Utility;

namespace ShmupTutorial.Systems;

public class Motion : MoonTools.ECS.System
{
    Filter MotionFilter;

    public Motion(World world) : base(world)
    {
        MotionFilter =
        FilterBuilder
        .Include<CanMove>()
        .Include<Position>()
        .Build();
    }

    public override void Update(TimeSpan delta)
    {
    }
}
what entities does our Motion system care about? those that have positions and can move. so that's our MotionFilter. now to fill in the update method:
public override void Update(TimeSpan delta)
{
	foreach (var entity in MotionFilter.Entities)
	{
		var moveDelta = Vector2.Zero;

		foreach (var move in ReadMessagesWithEntity<Move>(entity))
		{
			moveDelta += move.Delta;
		}

		if (moveDelta.LengthSquared() > 0.0f)
		{
			var speed = Get<CanMove>(entity).Speed;
			moveDelta *= speed * (float)delta.TotalSeconds;

			var position = Get<Position>(entity).Value;
			var newPosition =
			position + moveDelta;

			Set(entity,
				new Position(
					newPosition
			));
		}
	}
}
we iterate over our our entities from the filter, and use the ReadMessagesWithEntity method to get every message that wants this entity to move. right now there will only ever be one of these, but you could imagine there being multiple Move calls for a single entity on a single frame. doing it this way, looking up the messages associated with a single entity, means we don't have to go over every single move message just to find the ones we care about, and we want to sum all the movements an entity experiences into a single vector because it will make collision detection easier in the next step.
again, we do the LengthSquared check to see if we need to move the entity at all. we get the speed from the CanMove component on the entity, and then multiply the direction we have with the speed and delta time.
what's delta time? why do we multiply by it?
this update loop runs every frame. "delta time" is the amount of time passed since the last frame. if we were to move a certain amount of units every frame, that would cause problems if the framerate were ever inconsistent. multiplying by delta time converts our units from "per frame" to "per second," so the player will move at the same speed no matter the framerate.delta time is usually some small number, much less than 1. this is because games run at many frames per second, usually at least 60. so to get a method that runs once every frame to do something once every second, we have to scale it down a lot.
what's up with this TotalSeconds stuff? TimeSpan?
if you're used to unity, you may be used to getting your delta time as a simple float. FNA provides it as a TimeSpan, which is a more robust way of representing spans of time. TotalSeconds is the total number of seconds in the time span, which for a delta time is always going to be less than one unless something is very wrong. it's a double, not a float, which gives it more resolution for working with small numbers. this means your delta time measurements are more accurate. everything else is a float, though, so we have to convert it for the multiplication.
we add our new total delta to the position, and then Set the Position component to use our new value.
bringing it all back home
we've gotta initialize these systems and run their update loops. create some new variables at the top of ProjectName.cs:
Input Input;
Player Player;
Motion Motion;
i put these between the variable declaration for the World and the variable declaration for the SpriteRenderer.
now, in LoadContent, where the ExampleSystem initializer used to be:
Input = new Input(World);
Player = new Player(World);
Motion = new Motion(World);
and then, in Update:
protected override void Update(GameTime gameTime)
{
	Input.Update(gameTime.ElapsedGameTime);
	Player.Update(gameTime.ElapsedGameTime);
	Motion.Update(gameTime.ElapsedGameTime);
	World.FinishUpdate();
	base.Update(gameTime);
}
order matters here. if Player.Update runs before Input.Update, it won't ever be able to see the messages that Input.Update sends. if Motion.Update runs before Player.Update, it won't be able to see the player's Move messages. other ecs libraries sometimes have a lot of complex ways to specify the order in which systems run, but MoonTools.ECS doesn't. those other strategies sound clever but they're ultimately just annoying to grapple with when you could instead just run the systems in the order you want them to run.
now run the game...
cool! but there's a problem... we can just go off the screen. we could clamp the player's position so they can't do that, but we're going to need to solve this problem more robustly eventually. what we need is...
iv. collision detection
collision is one of the most profoundly misunderstood subjects in game development. because most big engines like unity and unreal come with these huge, complex rigidbody physics simulations, a lot of people assume that they're going to need to implement that themselves if they want to make a custom engine. this is not true! not only do you not have to implement actual physics just to detect and respond to collision, for many styles of game you will get better results with simpler collision systems. physically realistic is not always best!
so let's talk about collision in the abstract a little bit. what do we need?
first, we need some sort of collider shape, and a fast algorithm for determining collision. there are a lot of options here. in 2D, the most obvious choice is the axis-aligned bounding box (AABB). a bounding box is just a rectangle, and "axis aligned" means that it can't be rotated relative to the world axes.
there's also the orientable bounding box (OBB), which is a bounding box that can be rotated. if we wanted to go hog wild, we could even use a convex polygon as our bounding shape, and use GJK or the expanding polytope algorithm to determine collisions.
these options add additional complexity for very little benefit. especially in the world of shmups, it's extremely common for everything to be represented by an axis-aligned bounding box no matter its shape. the error between a non-square object like our player and the bounding box is so small as to be ignored in the heat of gameplay, especially because shmups generally make the player's hitbox much smaller than the player sprite.
for an example of how far AABBs can get you, look at this screenshot from street fighter with the hitboxes and hurtboxes highlighted:
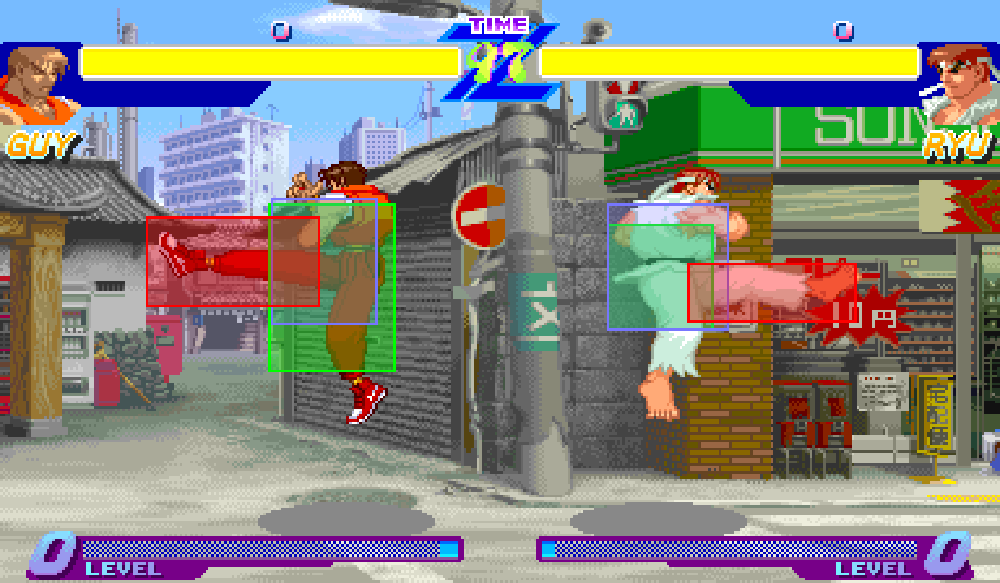
what's a hitbox? what's a hurtbox?
if you're neither a fighting game player nor a game developer, you might not know these terms.in fighting game parlance, a hitbox is the area that will do damage when it touches the enemy's hurtbox. outside of fighting games, people often use "hitbox" for both of these things, because outside of fighting games they're very often the same. fighting games have to have them separate for gameplay reasons: you don't want a player to do damage to another player by being hit by them.
ryu and guy are nowhere close to being shaped like AABBs, but the developers and designers at capcom were able to approximate their shapes using AABBs. look at how rough those approximations are! they're not even close to pixel-perfect. and this isn't just the case for this game, or street fighter, or old fighting games, this is how fighting games are made now, because it's just better. AABBs offer huge performance improvements compared to other methods because the algorithm to check their collision is so cheap. on top of that, this way of designing hitboxes is better for designers. it's much easier for designers to work with, it's much easier to make tooling for, and it results in better gameplay.
enough talk, let's code
we're going to leverage another feature of MoonTools.ECS (and many other ECS libraries) here: entity relations. an entity relation is just like a component in that it contains only data, but instead of being tied to just one entity, it's tied to two. we're going to do this to build a collision system that will let us attach multiple colliders to one entity to create more complex colliders.
an important aspect of relations is that they are directional. that is to say, Relate(a, b, new Relation()) is different to Relate(b, a, new Relation()). the first one is a relationship "from a to b," and the second is a relationship "from b to a."
we can get a relation from a to b, on a's end using the method OutRelation<Relation>(a), or on b's end using the method InRelation<Relation>(b). this directionality is really useful. it allows us to easily express that it's the player that has the collider, not the other way around, but we can still get the relation data from either end.
create a new relation in Relations.cs:
using Microsoft.Xna.Framework;

namespace ShmupTutorial.Relations;

public readonly record struct HasCollider();
add a new using ShmupTutorial.Relations; statement to the top of Player.cs and add to the player creation logic:
if (!Some<CanBeControlled>())
{
	var entity = CreateEntity();
	var sprite = Content.Textures.Player;

	var collider = CreateEntity();
	Set(collider, new AABB(0, 0, 8, 8));

	Set(entity, new Sprite(sprite, 0.0f));
	Set(entity, new Position(new Vector2(ShmupTutorial.RenderWidth * 0.5f, ShmupTutorial.RenderHeight * 0.5f)));
	Set(entity, new CanBeControlled());
	Set(entity, new CanMove(128.0f));
	Relate(entity, collider, new HasCollider());
}
so we create a second entity to store our collider, and then Relate them using the HasCollider relation we just created. the collider entity has just one component, the AABB.
you'll see we're using the AABB class i put in the Components directory of the FNAECSTemplate. you can have a look at the code if you want. it contains a definition of an AABB, as well as functions for checking if AABBs overlap (using the minkowski difference) and returns the penetration vector.
all we have to do is tweak our Motion system to use our new colliders.
first, we need a new filter to find all the colliders in the scene:
Filter ColliderFilter;

public Motion(World world) : base(world)
{
	MotionFilter = FilterBuilder.Include<CanMove>().Include<Position>().Build();
	ColliderFilter = FilterBuilder.Include<AABB>().Build();
}
now, we need a method to try out a movement we want to do and see if it will collide with anything, and adjust the trajectory to avoid the collision.
public (bool hit, Vector2 position, HashSet<Entity> hitEntities) CollisionTest(Entity entity, Vector2 delta)
{
	var colliders = OutRelations<HasCollider>(entity);
	var position = Get<Position>(entity).Value;
	var outPosition = position + delta;
	var hit = false;
	var hitEntities = new HashSet<Entity>();

	foreach (var collider in colliders)
	{
		foreach (var otherCollider in ColliderFilter.Entities)
		{
			var otherEntity = otherCollider;

			if (HasInRelation<HasCollider>(otherEntity))
				otherEntity = InRelationSingleton<HasCollider>(otherCollider);

			if (otherEntity != entity)
			{
				var rect = Get<AABB>(collider);
				rect = rect.ToWorld(outPosition);
				var otherRect = Get<AABB>(otherCollider);
				var otherPos = Has<Position>(otherEntity) ? Get<Position>(otherEntity).Value : Vector2.Zero;
				otherRect = otherRect.ToWorld(otherPos);

				var (vector, overlaps) = rect.Overlaps(otherRect);

				if (overlaps)
				{
					hit = true;
					outPosition -= vector;
					hitEntities.Add(otherEntity);
				}
			}
		}
	}

	return (hit, new Vector2(outPosition.X, outPosition.Y), hitEntities);
}
let's break this down.
first, our function signature. this needs to return three pieces of information: whether or not there was a collision, the adjusted end position of our trajectory to avoid any collisions, and all the entities we hit. for this, we use a tuple.
what's a tuple?
a tuple is a C# data structure you can create by wrapping variables in parentheses. it's a simple way to create a temporary fixed-length type-safe collection of variables of different types without creating a whole new type signature for it.we store all the hit entities in a HashSet, because we don't care if we hit the same entity more than once.
our CollisionTest method takes the entity we're testing, and its delta vector, i.e. how we want it to move this frame.
first, we get all the colliders this entity has. we set up colliders using relations so one entity can have more than one. we also the get the entity's starting position, and create a new variable called outPosition to represent the target destination. we also create a variable called hit, which will store whether we've collided with anything, and a variable called hitEntities, which will store the entities we hit.
now, we test each collider independently. with each collider, we go through every other collider in the scene and get the entity it is attached to. we want to support both colliders that don't have relations (for static objects like the level boundaries) and colliders that do have relations. if it has a relation, we treat the entity it's related to as the source of the collision. otherwise we use the collider entity itself.
next, we check to make sure we never check self-collisions. this lets you create complex shapes by layering AABBs on top of each other and it avoid the obvious problem of checking to see if an AABB collides with itself.
for the check itself, we get the rects and use the ToWorld method with the entity positions to convert them from local space to world space. this makes specifying the location of AABBs much easier, since when we create entities we can specify their position relative to the entity's origin and we don't have to update the AABB position every time the entity moves.
then, we use Overlaps to check the collision. if there's a collision, we set hit to true, adjust outPosition by the penetration vector, and add the entity we hit to the set of hit entities.
what's a penetration vector?
a penetration vector is a way of calculating "how much" one collider is overlapping with another, and the direction it's overlapping from. you can think of it for our purposes as the vector along which the entity must be moved in order to make the entities not collide anymore.at the end of the method, we return all the information we've collected.
now, let's adjust our Motion system's update loop to use this new method:
if (moveDelta.LengthSquared() > 0.0f)
{
	var speed = Get<CanMove>(entity).Speed;
	moveDelta *= speed * (float)delta.TotalSeconds;

	var position = Get<Position>(entity).Value;
	var newPosition = position;

	if (HasOutRelation<HasCollider>(entity))
	{
		var deltaX = new Vector2(moveDelta.X, 0.0f);
		var deltaY = new Vector2(0.0f, moveDelta.Y);

		var outX = CollisionTest(entity, deltaX);
		var outY = CollisionTest(entity, deltaY);

		newPosition = new Vector2(outX.position.X, outY.position.Y);
	}
	else
	{
		newPosition += moveDelta;
	}

	Set(entity, new Position(newPosition));
}
isn't there a problem with this algorithm?
yes! there are two problems.the first and most potentially significant problem is that this collision detection is discrete. what that means is that if the moving object has a velocity high enough that it places the collider's destination completely on the other side of a wall, it will just warp through. if you've seen the half A press video this is a crucial bug that pannenkoek2012 exploits to teleport mario outside of the level bounds by building up so much speed he goes completely through a wall.
this is fine for our game, because nothing is moving fast enough to warp through any of the walls. it's something to be cognizant of though. the solution to this for our game would be pixel marching, moving the AABB pixel by pixel and stopping as soon as a collision occurs.
the second problem is more subtle: we're checking the X and Y axes separately here. there exist scenarios where the individual X and Y axis movements won't cause a collision, but their combined movement will. this is usually not a problem for us because our colliders are moving at per-frame velocities that are less than the size of their colliders. the only scenario where this could happen is if one collider were to move into the corner of another similarly-sized collider. this is not a scenario that can happen in our game in a way that would affect gameplay for reasons related to the temporary invulnerability mechanics we're going to add later. it could happen in other kinds of game though, like a top-down zelda-style action RPG.
what i want to emphasize is: we don't need to address these problems because they can't happen in our game. there's no point in making our collision logic more complicated to make something that already can't happen even more impossible.
now we have this if statement that checks if the entity we want to move has one or more colliders. if it doesn't, we do what we did before. if it does, we check collision. we check the X and Y axes separately so that we can still move along one axis even if there's a collision along the other.
finally we need to add something to collide with. in ProjectName.cs, where there used to be the player creation code, instead put:
var leftBounds = World.CreateEntity();
World.Set(leftBounds, new AABB(-4.0f, RenderHeight * 0.5f, 8.0f, RenderHeight));

var rightBounds = World.CreateEntity();
World.Set(rightBounds, new AABB(RenderWidth + 4.0f, RenderHeight * 0.5f, 8.0f, RenderHeight));

var topBounds = World.CreateEntity();
World.Set(topBounds, new AABB(RenderWidth * 0.5f, -4.0f, RenderWidth, 8.0f));

var bottomBounds = World.CreateEntity();
World.Set(bottomBounds, new AABB(RenderWidth * 0.5f, RenderHeight + 4.0f, RenderWidth, 8.0f));
now, if you run the game, you shouldn't be able to leave the screen anymore:
a problem
there's another problem that might come up in some games, including ours. imagine, as is easily possible in a shmup, there are 100 hitboxes on the screen: the player, all the bullets, and all the enemies. in order to detect every collision, we have to perform every possible combination, which in math is called "100 choose 2," calculated as (100!)/(2! * 98!) = 4950. that's a lot! if there's 200 items on screen, which is still easily possible, it's 19,900 comparisons.
most of these comparisons, though, are stupid. they're comparing items that are nowhere near each other. if only there were some way to only compare items that are close enough to each other to possibly be colliding...
this is the problem a collision broadphase is supposed to solve. reading the problem, you might have thought of a simple one: just only check the collisions within a certain radius! unfortunately, this just moves the problem. to do this, we still have to do comparisons between every single pair of items every frame in order to compute their distances. what if we could figure out if two objects were close together without having to explicitly compute their distance?
it turns out there are lots of ways to do this. popular ones include quadtrees (in 2D) and octrees (in 3D), k-d trees, binary space partitioning, R-trees... you get the picture. because collision is such an important part of action games, considering what collision detection algorithm and broadphase you use is very important. sometimes you may not need a broadphase! in tyler glaiel's excellent blog post about why and how to make your own game engine, he mentions that the end is nigh shipped without a collision broadphase, and this makes perfect sense: there are very few objects on the screen at once, and most of them don't move.
we're going to use one called a spatial hash. i like this one because it's dead simple to implement and works great for a lot of different kinds of games. the idea behind a spatial hash is that you break up space into a grid, like this:
imagine that the colored squares are our colliders. each cell of the grid has an associated list of entities, sometimes called "bin" or "bucket." we put each entity into all the buckets its collider touches. then, when we want to know what could possibly be colliding with an entity, we retrieve all the other entities that are in the buckets its collider touches.
in this example, the smaller blue square fits only in one cell. the larger red square fits in several cells, but we can know for sure that these two shapes can't be colliding, because they aren't in any of the same cells. the medium sized yellow square does share some cells with the large red square, so we have to check in the narrow phase to discover that they aren't colliding. and finally, the green square is colliding with the red square, and we know to check it because they share several cells.
one important aspect of spatial hashes is you want to tune the cell size correctly. too small, and most objects will be in multiple cells, which means the insertion time will go up. too large, and most cells will contain too many objects, making the narrow phase collision checking slower. the sweet spot is usually somewhere around twice as large as a typical object in your game. our player hitbox is 8x8, so for us a good value might be 16x16.
if you've been paying attention, you might know what we can use to make this data structure: a Dictionary! inserting and looking up objects in a Dictionary is not free, but it's much cheaper than thousands of pairwise comparisons.
how does a Dictionary work?
a dictionary is what's called an "abstract data type," which can be implemented in a number of different ways. the most common implementation is called a "hash table" or "hash map," which is where the name "spatial hash" comes from.
the term "hash" refers to a special kind of function. a hash takes as input some kind of data, it doesn't matter what, and outputs a fixed-size value. imagine a function that takes a string as input and outputs a number from 0 to 255 depending on which string you put in.
a good hash function has a few properties. first, it should be fast. second, it needs to avoid what are called hash collisions. this is where two different inputs result in the same output. it's impossible to avoid this completely because of what's called the pigeonhole principle.
basically, there are infinitely many possible strings, but only a finite number of possible hashes, because we specified that it has to be a number from 0 to 255. imagine trying to put 10 pigeons in 9 pigeonholes (i don't know why this is the standard example. the past is a foreign country, with a lot more pigeons). it's pretty obvious that one of the holes is going to have to have two pigeons in it.
the way this gets turned into a hash map is thus: consider an array of length 256. if you used our hash function from earlier that outputs a number from 0 to 255, you could turn a string value into an index in the array. if you stored, say, another string in that array at that index, now you have an association between the first string (the key) and the second string (the value). if you pass the key string through the hash function again, you'll find the location in the array of the second string.
let's implement a spatial hash
first, at the top of Motion.cs, we need two more variables:
const int CellSize = 16;
const float CellReciprocal = 1.0f / CellSize;
Dictionary<(int, int), HashSet<Entity>> SpatialHash = new Dictionary<(int, int), HashSet<Entity>>();
first is the CellSize, or the size of our buckets for the spatial hash. here it's 16. we also store the CellReciprocal: we're going to be dividing by CellSize, and it's faster for the CPU to multiply by the reciprocal instead.
finally we have the SpatialHash, which is a Dictionary between (int, int) tuples and a HashSet<Entity>. tuples in C# are value types so we can create as many of them as we want very cheaply.
to get those (int, int) tuples, let's write a function to take a Vector2 and spit out the bucket it's in:
    public (int x, int y) Bucket(Vector2 position)
    {
        return (
            (int)MathF.Floor(position.X * CellReciprocal),
            (int)MathF.Floor(position.Y * CellReciprocal)
        );
    }
what's MathF.Floor?
it's a method that rounds down to the nearest integer. the MathF part means we're using the single-precision float math library, as opposed to Math, which works on double-precision doubles.
now we need a method to insert colliders into the hash:
public void Insert(Entity e)
{
	var aabb = Get<AABB>(e);

	if (HasInRelation<HasCollider>(e))
	{
		var parent = InRelationSingleton<HasCollider>(e);
		aabb = aabb.ToWorld(Get<Position>(parent).Value);
	}

	var minBucket = Bucket(aabb.TopLeft);
	var maxBucket = Bucket(aabb.BottomRight);

	for (int x = minBucket.x; x <= maxBucket.x; x++)
	{
		for (int y = minBucket.y; y <= maxBucket.y; y++)
		{
			var key = (x, y);
			if (!SpatialHash.ContainsKey(key))
			{
				SpatialHash.Add(key, new HashSet<Entity>());
			}

			SpatialHash[key].Add(e);
		}
	}
}
we do the same "get the AABB and convert it to world space if necessary" dance that we did in the CollsionTest method. then we get the smallest and largest bucket coordinates and use a double for loop to iterate over every bucket this collider touches.
to insert the entity, we first create the HashSet if it doesn't already exist, then add the entity to it.
the Retrieve method is almost the same but in reverse:
public HashSet<Entity> Retrieve(Entity e)
{
	var aabb = Get<AABB>(e);
	var entities = new HashSet<Entity>();

	if (HasInRelation<HasCollider>(e))
	{
		var parent = InRelationSingleton<HasCollider>(e);
		aabb = aabb.ToWorld(Get<Position>(parent).Value);
	}

	var minBucket = Bucket(aabb.TopLeft);
	var maxBucket = Bucket(aabb.BottomRight);

	for (int x = minBucket.x; x <= maxBucket.x; x++)
	{
		for (int y = minBucket.y; y <= maxBucket.y; y++)
		{
			var key = (x, y);
			if (SpatialHash.ContainsKey(key))
			{
				entities.UnionWith(SpatialHash[key]);
			}
		}
	}

	return entities;
}
instead of adding to the HashSet, we use UnionWith to add its contents to the main HashSet we're going to return.
now, in CollisonTest, replace
foreach (var otherCollider in CollisionFilter.Entities)
with
foreach (var otherCollider in Retrieve(collider))
and put the following at the top of Update:
foreach (var key in SpatialHash.Keys)
{
	SpatialHash[key].Clear();
}

foreach (var entity in ColliderFilter.Entities)
{
	Insert(entity);
}
the first step clears all the buckets so they can be ready for the new frame. the second step inserts every collider into the hash set so we can retrieve them later.
why clear the entire spatial hash every frame?
there's two approaches you can take with a spatial hash. you can clear the whole thing every frame, or you can implement methods to remove objects that have moved and reinsert them.we're doing this for two reasons. first: it's simpler. second, it's actually more performant for our game. you'd want to update only the moving entities for a game that had a lot of static level geometry that wasn't going to change from frame to frame, like in a platformer. in a shmup, we have very little that fits that description. almost everything in the game is going to move every single frame and have to be updated so there's practically no difference between the two methods.
we don't just call SpatialHash.Clear because those HashSets are classes, allocated on the heap. we don't want to destroy them every frame, that would cause a lot of garbage collection pressure. instead we just want to empty them out. speaking of which...
an optimiziation
reading that last paragraph, you may notice we're creating a bunch of HashSets every frame. we could improve this and use the same spatial hash multiple times.
we need two, at the top of Motion.cs:
HashSet<Entity> HitEntities = new HashSet<Entity>();
HashSet<Entity> RetrievedEntities = new HashSet<Entity>();
our Retrieve function signature changes:
void Retrieve(Entity e)
and we can replace
var entities = new HashSet<Entity>();
with
RetrievedEntities.Clear();
update our UnionWith:
if (SpatialHash.ContainsKey(key))
{
	RetrievedEntities.UnionWith(SpatialHash[key]);
}
and get rid of the
return entities;
at the end.
similarly, our collision test becomes
(bool hit, Vector2 position) CollisionTest(Entity entity, Vector2 delta)
and remove
var hitEntities = new HashSet<Entity>();
and our for loop is a little different, instead of
foreach (var otherCollider in Retrieve(collider))
it becomes
Retrieve(collider);
foreach (var otherCollider in RetrievedEntities)
and
hitEntities.Add(otherEntity)
becomes
HitEntities.Add(otherEntity)
and don't forget to modify the return:
return (hit, new Vector2(outPosition.X, outPosition.Y));
and when calling CollisionTest:
HitEntities.Clear();
var outX = CollisionTest(entity, deltaX);
var outY = CollisionTest(entity, deltaY);
this kind of optimization can make the code harder to understand, and it's a bit of a pain in the ass, but the Motion system is the beating heart of this whole operation. every little optimization we can squeeze out really counts to improving the performance of the whole game.
at this point, if you run the game, it should work exactly the same as before we did any of the broadphase stuff. when you've done something right, people won't know you've done anything at all.
we're going to have to return to the land of collision detection in a moment, but let's take a small break.
v. spawning
it wouldn't be a shmup if we couldn't shoot ('em up). let's implement that.
first, we need some new components:
public readonly record struct Direction(Vector2 Value);
public readonly record struct CanDealDamage();
and a new message
public readonly record struct Shoot(Entity Source, Vector2 Direction, float Speed);
why keep speed and direction separate? why not just put them in one vector?
this will simplify the math necessary to make bullets move in interesting patterns while keeping them at the same speed.now, our Bullet system:
using System;
using MoonTools.ECS;
using ShmupTutorial.Components;
using ShmupTutorial.Data;
using ShmupTutorial.Messages;

namespace ShmupTutorial.Systems;

public class Bullet : MoonTools.ECS.System
{
    public Filter BulletFilter;

    public Bullet(World world) : base(world)
    {
        BulletFilter = FilterBuilder
                        .Include<Sprite>()
                        .Include<Position>()
                        .Include<Direction>()
                        .Include<CanMove>()
                        .Include<CanDealDamage>()
                        .Build();
    }

    public override void Update(TimeSpan delta)
    {
        foreach (var message in ReadMessages<Shoot>())
        {
            var position = Get<Position>(message.Source).Value;

            var entity = CreateEntity();
            Set(entity, new Sprite(Content.Textures.Bullet, 0.0f));
            Set(entity, new Position(position));
            Set(entity, new Direction(message.direction));
            Set(entity, new CanMove(message.Speed));
            Set(entity, new CanDealDamage());
        }
    }
}
you should at this point have a pretty good idea of what all this does, but let's go through it.
the main thing that's different here is the complexity of the filter. remember the fruits principle? we don't need a separate Bullet component, we can identify what is and is not a bullet using components we already have. a bullet is something with a Sprite, Position, and Direction which CanMove and CanDealDamage.
in Update, we look for Shoot messages and spawn in the bullets. create an entity, give it components, you've seen this before.
why don't we specify how much damage the bullets can do?
for the purposes of this game, we're going to assume all bullets do 1 damage. this makes a lot of sense: bullets that hit the player will just take away a life, and it makes it easier to scale enemies so we always know how many hits they'll take to kill.don't forget to initialize and update the system in ProjectName.cs:
Bullet Bullet;

(...)

Bullet = new Bullet(World);

(...)

protected override void Update(GameTime gameTime)
{
	Input.Update(gameTime.ElapsedGameTime);
	Player.Update(gameTime.ElapsedGameTime);
	Bullet.Update(gameTime.ElapsedGameTime);
	Motion.Update(gameTime.ElapsedGameTime);
	World.FinishUpdate();
	base.Update(gameTime);
}
also let's add a bit to the Motion system to use this Direction information:
foreach (var entity in MotionFilter.Entities)
{
	var moveDelta = Vector2.Zero;

	foreach (var move in ReadMessagesWithEntity<Move>(entity))
	{
		moveDelta += move.Delta;
	}

	if (Has<Direction>(entity)) //NEW
		moveDelta += Get<Direction>(entity).Value; //NEW
now we need to send shoot messages from the Player. let's update our input handler:
var shoot = false;

foreach (var input in ReadMessages<InputAction>())
{
    if (input.State == ActionState.Pressed || input.State == ActionState.Held)
    {
        switch (input.Action)
        {
            case Actions.MoveX:
                movement += Vector2.UnitX * input.Value;
                break;
            case Actions.MoveY:
                movement += Vector2.UnitY * input.Value;
                break;
            case Actions.Shoot:
                shoot = true;
                break;
            default:
                break;
        }
    }
}
and the shooting and movement messages:
if (shoot)
    Send(new Shoot(player, -Vector2.UnitY, 256.0f));

if (movement.LengthSquared() > 0.0f)
    Send(player, new Move(movement));
alright now let's just launch the game and see ---
holy crap! that's a lot of bullets. it's firing a bullet every frame. also, these bullets have no colliders and never get destroyed, so if you held down the button forever you'd slow the game to a crawl and then run out of memory.
shouldn't you use a spawning pool?
this is one of the best things about ECS: no. the spawning pool pattern exists in the actor model because things like bullets are allocated on the heap, which generates garbage when they're destroyed, so you want to re-use them. in ECS, entities and components are extremely cheap to create and destroy, and there's no garbage collection pressure, so awkward tedious patterns like spawning pools are no longer needed.let's fix the first thing first. it might be tempting to go with a bespoke solution just for bullet delay, but let's stop and think for a moment. delay and other timer-based mechanics are extremely common in video games. what if we could have a generic timer system that we could use to easily add new functions like that to our game?
create a new component:
public struct Timer
{
    public float Time { get; private set; }
    public float Max { get; }
    public float Remaining
    {
        get
        {
            return Time / Max;
        }
    }

    public Timer(float time)
    {
        Time = Max = time;
    }

    public Timer Update(float newTime)
    {
        Time = newTime;
        return this;
    }
}
what's up with this get; and set; business?
these are a C# feature called "properties." a property allows you to have a lot of control over how variables get their values and who can get and set those values.
the Time variable is an example of an "auto property." we don't have to fill in the body of the get and set, they're filled in with the default behavior of a variable. the reason we would do this is it allows us tight acccess control: here anyone can read the value of Time but only the struct itself can set it.
Max has no set, which means it can only be set in the constructor and is otherwise read-only. Remaining has a get with a body, which allows the value of this variable to be calculated on the fly based on other variables.
this is a full struct instead of a one-liner because we want more features from our timer. we won't use them right now, but later.
now, create a CanShoot component:
public readonly record struct CanShoot(float Delay);
and add it to the player:
if (!Some<CanBeControlled>())
{
	var entity = CreateEntity();
	var sprite = Content.Textures.Player;

	var collider = CreateEntity();
	Set(collider, new AABB(0, 0, 8, 8));

	Set(entity, new Sprite(sprite, 0.0f));
	Set(entity, new Position(new Vector2(ShmupTutorial.RenderWidth * 0.5f, ShmupTutorial.RenderHeight * 0.5f)));
	Set(entity, new CanBeControlled());
	Set(entity, new CanMove(128.0f));
    Set(entity, new CanShoot(0.1f));
	Relate(entity, collider, new HasCollider());
}
and then add a new relation:
public readonly record struct DisableShoot();
now let's create a new system called Time.cs:
using System;
using MoonTools.ECS;
using ShmupTutorial.Components;

namespace ShmupTutorial.Systems;

public class Time : MoonTools.ECS.System
{
    public Filter TimerFilter;

    public Time(World world) : base(world)
    {
        TimerFilter = FilterBuilder
                        .Include<Timer>()
                        .Build();
    }

    public override void Update(TimeSpan delta)
    {
        foreach (var entity in TimerFilter.Entities)
        {
            var timer = Get<Timer>(entity);
            var t = timer.Time - (float)delta.TotalSeconds;

            if (t <= 0.0f)
                Destroy(entity);
            else
                Set(entity, timer.Update(t));
        }
    }
}
all this does is look for every timer in the scene, reduce the amount of time on it by the current delta time, and destroy the timer if it's less than zero. when entities are destroyed, their relationships are destroyed with them. see where this is going?
we created this timer.Update method because we want to keep the original value of Max. if we used the constructor again, Max would get reset to the same value as Time.
don't forget to initialize in ProjectName.cs:
Time Time;

(...)

Time = new Time(World);

(...)

protected override void Update(GameTime gameTime)
{
	Time.Update(gameTime.ElapsedGameTime);
	Input.Update(gameTime.ElapsedGameTime);
	Player.Update(gameTime.ElapsedGameTime);
	Bullet.Update(gameTime.ElapsedGameTime);
	Motion.Update(gameTime.ElapsedGameTime);
	World.FinishUpdate();
	base.Update(gameTime);
}
let's change our Shoot logic in the Bullet system:
foreach (var message in ReadMessages<Shoot>())
{
	if (Has<CanShoot>(message.Source) && !HasInRelation<DisableShoot>(message.Source))
	{
		var position = Get<Position>(message.Source).Value;

		var entity = CreateEntity();
		Set(entity, new Sprite(Content.Textures.Bullet, 0.0f));
		Set(entity, new Position(position));
		Set(entity, new Direction(message.direction));
		Set(entity, new CanMove(message.Speed));
		Set(entity, new CanDealDamage());

		Send(entity, new Move(message.direction));

		var delay = Get<CanShoot>(message.Source).Delay;
		var timer = CreateEntity();
		Set(timer, new Timer(delay));
		Relate(timer, message.Source, new DisableShoot());
	}
}
mostly the same, but now there's this check at the top for CanShootand this HasInRelation check for DisableShoot. when the entity shoots, it reads the Delay field from the CanShoot component and creates a timer of that length related to the shooter with a DisableShoot relation.
this is very powerful. now, not only the player will have an appropriate shooting delay, but all enemies will as well, since they'll use this same shooting logic. on top of that, we have a generic system for disabling shooting based on a timer. want to disable shooting for a second when the player takes damage? want to disable shooting for a reloading mechanic? you can do that here. any system can add a timer with a DisableShoot relation to the player, there can be more than one of them, and as long as one of them is present, the player can't shoot.
if we run this, it looks much better:
but our bullets are still sticking around forever. we may want them to be destroyed if they go off the screen, but if they're destroyed immediately upon hitting the level bounds that would look pretty bad. also, sometimes shmups give you weapons with more limited range. we really want our bullets to be destroyed after they've traveled a certain distance.
create two new components:
public readonly record struct DestroyOnDistanceTraveled(float Max, float Traveled = 0.0f);
public readonly record struct MarkedForDestroy();
the DestroyOnDistanceTraveled is going to do what it says on the tin, keep track of the traveled distance and destroy the entity when it's traveled too far. that's where MarkedForDestroy comes in. we have two problems: one is that sometimes we'll want to destroy an entity, but we may still need to use it before it's destroyed. the other is that many of our entities have relations to colliders we also want to destroy, and we have to clean those up. rather than a repetitive pattern, let's make a Destroyer system:
using System;
using MoonTools.ECS;
using ShmupTutorial.Components;
using ShmupTutorial.Relations;

namespace ShmupTutorial.Systems;

public class Destroyer : MoonTools.ECS.System
{
    public Filter DestroyFilter;

    public Destroyer(World world) : base(world)
    {
        DestroyFilter = FilterBuilder
                        .Include<MarkedForDestroy>()
                        .Build();
    }

    public override void Update(TimeSpan delta)
    {
        foreach (var entity in DestroyFilter.Entities)
        {
            foreach (var collider in OutRelations<HasCollider>(entity))
                Destroy(collider);

            Destroy(entity);
        }
    }
}
we won't have to use this for every destruction, we can freely destroy objects that have no relations and are guaranteed to never be used by another system before the end of the frame with the regular Destroy method. for instance, we don't have to use this to destroy Timers. but this will be very handy and allow us to all in one place run the checks and any cleanup logic that needs to happen whenever an entity gets destroyed.
don't forget to update ProjectName.cs:
Destroyer Destroyer;

(...)

Destroyer = new Destroyer(World);

(...)

protected override void Update(GameTime gameTime)
{
    Destroyer.Update(gameTime.ElapsedGameTime);
	Time.Update(gameTime.ElapsedGameTime);
	Input.Update(gameTime.ElapsedGameTime);
	Player.Update(gameTime.ElapsedGameTime);
	Bullet.Update(gameTime.ElapsedGameTime);
	Motion.Update(gameTime.ElapsedGameTime);
	Collision.Update(gameTime.ElapsedGameTime);
	World.FinishUpdate();
	base.Update(gameTime);
}
Destroyer can really run at any time, since it's reading components and not messages. i'm putting it first because we're going to have it send a message to another system later.
now, after the collision checks, add the following to the Motion system:
if (HasOutRelation<HasCollider>(entity))
{
	var deltaX = new Vector2(moveDelta.X, 0.0f);
	var deltaY = new Vector2(0.0f, moveDelta.Y);

	HitEntities.Clear();

	var outX = CollisionTest(entity, deltaX);
	var outY = CollisionTest(entity, deltaY);

	newPosition = new Vector2(outX.position.X, outY.position.Y);
}
else
{
	newPosition += moveDelta;
}

//NEW!
if (Has<DestroyOnDistanceTraveled>(entity) && !Has<MarkedForDestroy>(entity))
{
	var dest = Get<DestroyOnDistanceTraveled>(entity);
	var distance = (newPosition - position).Length();
	var totalDist = dest.Traveled;
	totalDist += distance;
	Set(entity, new DestroyOnDistanceTraveled(dest.Max, totalDist));
	if (totalDist > dest.Max)
	{
		Set(entity, new MarkedForDestroy());
	}
}

Set(entity, new Position(newPosition));
get the actual distance traveled by subtracting the new position from the old position, check if that's over the allowed max, and if it is, mark it for destruction. also update the total distance on the component so it keeps track. we also check in the if if it's already marked for destruction, because there's no point in running this check if the entity is just going to get destroyed for some other reason anyway.
now we can add it to our bullet spawning logic:
var entity = CreateEntity();
var sprite = Content.Textures.Bullet;
Set(entity, new Sprite(sprite, 1.0f));
Set(entity, new Position(position));
Set(entity, new Direction(message.Direction));
Set(entity, new CanMove(message.Speed));
Set(entity, new CanDealDamage());
Set(entity, new DestroyOnDistanceTraveled(ShmupTutorial.RenderHeight * 1.5f));
our range here is going to be a little more than the RenderHeight, so our bullets will always disappear offscreen. but you can set that number to anything. play around with it to get results like this:
(that's with a max distance of 128.)
now that we have "shoot," we still need an 'em to shoot up.
spawning enemies
our basic Enemy system is very simple:
using System;
using Microsoft.Xna.Framework;
using MoonTools.ECS;
using ShmupTutorial.Components;
using ShmupTutorial.Data;
using ShmupTutorial.Relations;
using ShmupTutorial.Utility;

namespace ShmupTutorial.Systems;

public class Enemy : MoonTools.ECS.System
{
    public Filter EnemyFilter;

    public Enemy(World world) : base(world)
    {
        EnemyFilter = FilterBuilder
                        .Include<Sprite>()
                        .Include<Position>()
                        .Include<CanMove>()
                        .Include<CanDealDamage>()
                        .Exclude<DestroyOnDistanceTraveled>()
                        .Build();
    }

    public override void Update(TimeSpan delta)
    {
        if (EnemyFilter.Count == 0)
        {
            var enemy = CreateEntity();
            var sprite = Content.Textures.Enemy;
            Set(enemy, new Sprite(sprite, 0.5f));
            Set(enemy, new Position(new Vector2(Rando.Range(0, ShmupTutorial.RenderWidth), ShmupTutorial.RenderHeight * 0.2f)));
            Set(enemy, new CanMove(64.0f));
            Set(enemy, new CanDealDamage());

            var collider = CreateEntity();
            Set(collider, new AABB(0f, 0f, sprite.Width, sprite.Height));
            Relate(enemy, collider, new HasCollider());
        }
    }
}
and don't forget to update ProjectName.cs:
Enemy Enemy;

(...)

Enemy = new Enemy(World);

(...)

protected override void Update(GameTime gameTime)
{
    Destroyer.Update(gameTime.ElapsedGameTime);
    Time.Update(gameTime.ElapsedGameTime);
    Input.Update(gameTime.ElapsedGameTime);
    Player.Update(gameTime.ElapsedGameTime);
    Enemy.Update(gameTime.ElapsedGameTime);
    Bullet.Update(gameTime.ElapsedGameTime);
    Motion.Update(gameTime.ElapsedGameTime);
    World.FinishUpdate();
    base.Update(gameTime);
}
we don't even need any new components, we can express what an Enemy is for our purposes using exclusively components we already have: it's something that has a Sprite and a Position, it CanMove and CanDealDamage, but it doesn't DestroyOnDistanceTraveled. there's a few other components we'll add later to further differentiate an Enemy from a Bullet.
the spawning logic is exactly the same as for the Player, only with some of the values tweaked and no CanBeControlled component. we're using the Rando random number generator class I include with the FNAECSTemplate to position the enemy somewhere randomly between the left and right edges of the screen.
if you run this and try to shoot the enemy, you'll immediately see there's a problem:
well THAT'S not supposed to happen.
vi. collision detection ii: cruise control
we have a few problems to solve.
- bullets should disappear when they hit things.
- bullets shouldn't hit the entity that shot them. (this is why the bullets fire off-center)
- bullets shouldn't collide with each other.
let's tackle this second problem first. again, like with the timer, we may be tempted to do a hacky solution to this, but let's think about what we really want. we want to have control over which entities can collide with each other. we want collision layers.
collision layers are kind of exactly what they sound like. you can think of them like layers in photoshop if that's familiar to you, or just like abstract categories or tags. things can only interact via collision if they share a layer, and unlike in photoshop, a single entity can be on multiple layers.
how do we implement this? we want these comparisons to be fast, and we want them to be easy for us to write. fortunately, there's something for us: bitflags.
in C#, bitflags are a kind of enum. create a new enum in the Components file:
[Flags]
public enum CollisionLayer
{
    None = 0,
    Level = 1,
    Actor = 2,
    Player = 4,
    Enemy = 8,
    Bullet = 16,
    Pickup = 32,
    PlayerActor = Player | Actor | Level | Pickup,
    EnemyActor = Enemy | Actor,
    PlayerBullet = Enemy | Bullet,
    EnemyBullet = Player | Bullet
}
ok so this is a bit of a mess of notation. but let's break it down. bitflags take advantage of two things: binary numbers and bitwise operations.
consider the number 32 (the highest number in our bitflag) written in binary:
100000
it's a 1 in the highest place value, and then all zeroes. now imagine that instead of thinking about it as "32," we thought of each digit as an on/off or true/false flag for one of our layers. so something with only the Level layer would look like:
000001
something with the Level layer and the Player layer would be:
000101
something with just the Enemy layer would be;
001000
and so on.
how do we check to see if two objects share a layer? with the bitwise and operator.
bitwise operators are called that because they work on each digit, or bit, individually.
the operators we are concerned with are & (and) and | (or). you'll notice these look a lot like their boolean counterparts && and ||, but don't confuse them.
the & operator goes bit by bit through its two operands and makes the bit in the output bit 1 if the corresponding bits in both operands is 1.
consider 000101 & 001000. this is easier to see when written vertically:
000101
AND
001000

000000 // result
the output here is zero because these two numbers don't share any 1s. in contrast, consider:
000101
AND
001001

000001
we got a match! the result here is non-zero because the last place in both operands is 1, so the output is 1. this means we can easily check if two colliders share a layer with
LayerA & LayerB != 0
if this is true, they share a layer somewhere and should collide.
often, we'll want colliders to be on multiple layers. this is where the | operator comes in. this makes the output bit 1 if either operand has a 1 in that position. an example:
000101
OR
001000

001101
we can use this to combine layers. LayerA | LayerB is a way of combining the two into a single number that has both. that's what we're saying with the
PlayerActor = Player | Actor | Level | Pickup,
EnemyActor = Enemy | Actor | Level,
PlayerBullet = Enemy | Bullet,
EnemyBullet = Player | Bullet
section of our bitflags. you can think of this as kind of like defining a "prefab" layer combination. when we use CollisionLayer.PlayerActor, it's just like if we said CollisionLayer.Player | CollisionLayer.Actor | CollisionLayer.Level | CollisionLayer.Pickup, but way less verbose.
we have all these layers because we need some entities, like bullets and enemies, to avoid self-collision. i'll show you as we build.
first, we need a new component:
public readonly record struct Layer(CollisionLayer Collide, CollisionLayer Exclude = 0);
so we can specify layers for collision, as well as layers we don't want to collide with.
we can now change the player collider creation logic:
var collider = CreateEntity();
Set(collider, new AABB(0, 0, 8, 8));
Set(collider, new Layer(CollisionLayer.PlayerActor));
the enemy colllider creation logic:
var collider = CreateEntity();
Set(collider, new AABB(0f, 0f, sprite.Width, sprite.Height));
Set(collider, new Layer(CollisionLayer.EnemyActor, CollisionLayer.Enemy));
Relate(enemy, collider, new HasCollider());
the level boundaries creation logic:
var leftBounds = World.CreateEntity();
World.Set(leftBounds, new Layer(CollisionLayer.Level));
World.Set(leftBounds, new AABB(-4.0f, RenderHeight * 0.5f, 8.0f, RenderHeight));

var rightBounds = World.CreateEntity();
World.Set(rightBounds, new Layer(CollisionLayer.Level));
World.Set(rightBounds, new AABB(RenderWidth + 4.0f, RenderHeight * 0.5f, 8.0f, RenderHeight));

var topBounds = World.CreateEntity();
World.Set(topBounds, new Layer(CollisionLayer.Level));
World.Set(topBounds, new AABB(RenderWidth * 0.5f, -4.0f, RenderWidth, 8.0f));

var bottomBounds = World.CreateEntity();
World.Set(bottomBounds, new Layer(CollisionLayer.Level));
World.Set(bottomBounds, new AABB(RenderWidth * 0.5f, RenderHeight + 4.0f, RenderWidth, 8.0f));
and first update the Shoot message:
public readonly record struct Shoot(Entity Source, CollisionLayer Layer, Vector2 Direction, float Speed);
and its use in the Player system:
Send(new Shoot(player, CollisionLayer.PlayerBullet, -Vector2.UnitY, 256.0f));
then update the bullet collider creation logic:
var entity = CreateEntity();
var sprite = Content.Textures.Bullet;
Set(entity, new Sprite(sprite, 0.0f));

...

var collider = CreateEntity();
Set(collider, new AABB(0f, 0f, sprite.Width, sprite.Height));
Set(collider, new Layer(message.Layer, CollisionLayer.Bullet));
Relate(entity, collider, new HasCollider());
note how the bullet collider excludes all entities on the Bullet layer, so bullets will never self collide.
now we can update our Motion system. first, change the collider filter:
ColliderFilter = FilterBuilder
.Include<AABB>()
.Include<Layer>()
.Build();
and in the CollisionTest method, get the layers for the moving collider:
foreach (var collider in colliders)
{
	var layer = Get<Layer>(collider);
and the other collider:
foreach (var otherCollider in RetrievedEntities)
{
	var otherEntity = otherCollider;

	if (HasInRelation<HasCollider>(otherEntity))
		otherEntity = InRelationSingleton<HasCollider>(otherEntity);

	var otherLayer = Get<Layer>(otherCollider);
and use it in the if where we previously just checked for self-collision:
if (otherEntity != entity &&
	(layer.Collide & otherLayer.Collide) != 0 &&
	(layer.Exclude & otherLayer.Collide) == 0
	)
resolving collisions
ok, so we want something to happen when the bullets hit the level bounds. first, create a new component:
public readonly record struct DestroyOnHit();
and while we're at it, attach it to the bullets:
var entity = CreateEntity();
var sprite = Content.Textures.Bullet;
Set(entity, new Sprite(sprite, 0.0f));
Set(entity, new Position(position));
Set(entity, new Direction(message.Direction));
Set(entity, new CanMove(message.Speed));
Set(entity, new CanDealDamage());
Set(entity, new DestroyOnHit());
you can also Include this in the Bullet filter:
BulletFilter = FilterBuilder
				.Include<Sprite>()
				.Include<Position>()
				.Include<Direction>()
				.Include<CanMove>()
				.Include<CanDealDamage>()
				.Include<DestroyOnHit>()
				.Include<DestroyOnDistanceTraveled>()
				.Build();
and Exclude it from the Enemy filter:
EnemyFilter = FilterBuilder
				.Include<Sprite>()
				.Include<Position>()
				.Include<CanMove>()
				.Include<CanDealDamage>()
				.Exclude<DestroyOnHit>()
				.Exclude<DestroyOnDistanceTraveled>()
				.Build();
and create a new message:
public readonly record struct Collide(Entity A, Entity B);
now create a new system, Collision.cs:
using System;
using MoonTools.ECS;
using ShmupTutorial.Components;
using ShmupTutorial.Messages;
using ShmupTutorial.Relations;

namespace ShmupTutorial.Systems;

public class Collision : MoonTools.ECS.System
{
    public Collision(World world) : base(world)
    {

    }

    public override void Update(TimeSpan delta)
    {
        foreach (var collision in ReadMessages<Collide>())
        {

            if (Has<DestroyOnHit>(collision.A))
                Set(collision.A, new MarkedForDestroy());


            if (Has<DestroyOnHit>(collision.B))
                Set(collision.B, new MarkedForDestroy());
        }
    }
}
this probably makes sense to you. read all the incoming Collide messages, check if either of the involved entities is destroyed on a collision, and if so, destroy it.
initialize in ProjectName.cs:
Collision Collision;

(...)

Collision = new Collision(World);

(...)

protected override void Update(GameTime gameTime)
{
	Time.Update(gameTime.ElapsedGameTime);
	Input.Update(gameTime.ElapsedGameTime);
	Player.Update(gameTime.ElapsedGameTime);
	Bullet.Update(gameTime.ElapsedGameTime);
	Motion.Update(gameTime.ElapsedGameTime);
	Collision.Update(gameTime.ElapsedGameTime);
	World.FinishUpdate();
	base.Update(gameTime);
}
to send these messages, go to our Motion system and update it:
var outX = CollisionTest(entity, deltaX);
var outY = CollisionTest(entity, deltaY);

foreach (var other in HitEntities)
{
    bool duplicate = false;
    foreach (var msg in ReadMessagesWithEntity<Collide>(other))
    {
        if (msg.B == entity)
        {
            duplicate = true;
            break;
        }
    }

    if (!duplicate)
        Send(entity, new Collide(entity, other));
}
we have to do a little bit of deduplication, because sometimes both entities motion will detect a collison, but we only want one message sent per pair of entities. we can leverage ReadMessagesWithEntity to make sure we never sent the same pair of entities twice.
much better!
but the bullets still don't... do anything. you can shoot this guy forever and he won't die.
viii. damage and health
we need a new component:
public readonly record struct CanTakeDamage(int HP);
and a new message:
public readonly record struct Damage();
now, in our Collision system:
foreach (var collision in ReadMessages<Collide>())
{
    if (Has<CanDealDamage>(collision.A) && Has<CanTakeDamage>(collision.B))
        Send(collision.B, new Damage());

    if (Has<CanDealDamage>(collision.B) && Has<CanTakeDamage>(collision.A))
        Send(collision.A, new Damage());
we need a new system to handle those Damage messages, so create a Health system:
using System;
using MoonTools.ECS;
using ShmupTutorial.Components;
using ShmupTutorial.Messages;

namespace ShmupTutorial.Systems;

public class Health : MoonTools.ECS.System
{
    public Filter DamageFilter;

    public Health(World world) : base(world)
    {
        DamageFilter = FilterBuilder
                        .Include<CanTakeDamage>()
                        .Build();
    }

    public override void Update(TimeSpan delta)
    {
        foreach (var entity in DamageFilter.Entities)
        {
            var hp = Get<CanTakeDamage>(entity).HP;
            foreach (var message in ReadMessagesWithEntity<Damage>(entity))
            {
                hp -= 1;
            }

            if (hp <= 0)
            {
                Set(entity, new MarkedForDestroy());
            }

            Set(entity, new CanTakeDamage(hp));
        }
    }
}
and meanwhile, in our Enemy system, add a new component to the spawning logic (and to the filter):
Set(enemy, new CanTakeDamage(5));

now we can destroy the squares! take that!
that was really fast. getting things started took a long time, but now that we have a scaffolding in place, it's getting pretty quick to add new features.
ix. spawning ii: spawn harder
so this game isn't very fun. the enemies don't move around, and only one spawns at a time. also obviously they don't do damage to the player.
first, let's create a new component:
public readonly record struct DestroyWhenOffScreen();
we'll need this so the enemies get cleaned up when they go offscreen.
let's implement this in Motion, after the DestroyOnDistanceTraveled code:
if (Has<DestroyWhenOffScreen>(entity) && !Has<MarkedForDestroy>(entity))
{
	var pos = Get<Position>(entity).Value;
	var rect = new Rectangle((int)pos.X, (int)pos.Y, 1, 1);

	if (Has<Sprite>(entity))
	{
		var sprite = Get<Sprite>(entity).Rect;
		rect.Width = sprite.Width;
		rect.Height = sprite.Height;
		rect.X -= (int)(sprite.Width * 0.5f);
		rect.Y -= (int)(sprite.Height * 0.5f);
	}

	var screenRect = new Rectangle(0, 0, ShmupTutorial.RenderWidth, ShmupTutorial.RenderHeight);

	if (!screenRect.Intersects(rect))
		Set(entity, new MarkedForDestroy());
}
here we're using the Intersects functionality of the built in FNA Rectangle class to check if the sprite rectangle is inside the screen rectangle. the only curious thing here is the bit where we subtract half the sprite width from rect.X and rect.Y, but that's because FNA's Rectangle has its origin in the top left, while our entities all have their origin in the center.
you can add DestroyWhenOffScreen to the bullets as well if you want, in addition to the DestroyWhenDistanceTraveled. there's obviously no point in doing anything with a bullet that's gone off screen.
anyway, let's update our enemy spawning logic:
while (EnemyFilter.Count < 5) //CHANGED
{
	var enemy = CreateEntity();
	var sprite = Content.Textures.Enemy;
	Set(enemy, new Sprite(sprite, 0.5f));
	Set(enemy, new Position(new Vector2(Rando.Range(0f, ShmupTutorial.RenderWidth), -sprite.Height * 0.49f))); //CHANGED
	Set(enemy, new CanMove(64.0f));
	Set(enemy, new CanDealDamage());
	Set(enemy, new CanTakeDamage(2)); //CHANGED
	Set(enemy, new Direction(Vector2.UnitY)); //NEW
	Set(enemy, new DestroyWhenOffScreen()); //NEW

	var collider = CreateEntity();
	Set(collider, new AABB(0f, 0f, sprite.Width, sprite.Height));
	Set(collider, new Layer(CollisionLayer.EnemyActor, CollisionLayer.Enemy));
	Relate(enemy, collider, new HasCollider());
}
now we're spawning the enemies off the top of the screen (but not so off screen that they'll get cleaned up by the Motion system), and i changed the amount of health enemies have now that there's more of them. the enemy now has a Direction (straight down) and our new DestroyWhenOffScreenComponent. also, instead of spawning one new enemy whenever one dies, it will spawn new enemies whenever there's fewer than 5.
now this is looking more like a video game. not a particularly good video game, but a video game.
x. main menu
the time has come to add a main menu. well, a semblance of one. we need something to return to when the player dies. in order to add a menu, first we must address text storage and rendering.
you may recall me saying earlier that components in MoonTools.ECS must be unmanaged. this is where that becomes a problem. this means we can't store a string.
that's ok though: we can reinvent the concept of pointers from first principles and write a system to assign each string we want to store an ID number, and retreive the strings using that ID number. here's what that looks like:
using System.Collections.Generic;

namespace ShmupTutorial.Data
{
    public static class TextStorage
    {
        static Dictionary<string, int> StringToID = new Dictionary<string, int>();
        static string[] IDToString = new string[256];
        static Stack<int> OpenIDs = new Stack<int>();
        static int NextID = 0;

        public static string GetString(int id)
        {
            return IDToString[id];
        }

        public static int GetID(string text)
        {
            if (!StringToID.ContainsKey(text))
            {
                RegisterString(text);
            }

            return StringToID[text];
        }

        static void RegisterString(string text)
        {
            if (OpenIDs.Count == 0)
            {
                if (NextID >= IDToString.Length)
                {
                    System.Array.Resize(ref IDToString, IDToString.Length * 2);
                }
                StringToID[text] = NextID;
                IDToString[NextID] = text;
                NextID += 1;
            }
            else
            {
                StringToID[text] = OpenIDs.Pop();
            }
        }
    }
}
this TextStorage class was originally written by evan hemsley for samurai gunn 2. it does a few fancy things for performance reasons, but it's ultimately quite simple to use. when we call GetID with a string as the argument, it will return a number. when we call GetString with that number later, it will return the string.
now we need a new component to store text:
public readonly record struct Text(int ID);
now we can update our SpriteRenderer to also render text with a filter and font variable. feel free to use a different font if you'd like, this one is very ugly.
using FontStashSharp;

(...)

Filter TextFilter;
DynamicSpriteFont Font;

public SpriteRenderer(World world, SpriteBatch spriteBatch) : base(world)
{
    SpriteBatch = spriteBatch;
    SpriteFilter = FilterBuilder
        .Include<Position>()
        .Include<Sprite>()
        .Build();

    TextFilter = FilterBuilder
    .Include<Position>()
    .Include<Text>()
    .Build();

    Font = Content.Fonts.Opensans.GetFont(16);
}
and then, in our Draw method:
foreach (var entity in TextFilter.Entities)
{
    var position = Get<Position>(entity).Value;
    var text = TextStorage.GetString(Get<Text>(entity).ID);
    var size = Font.MeasureString(text);

    SpriteBatch.DrawString(
        Font,
        text,
        new Vector2((int)position.X, (int)position.Y),
        Color.White,
        null,
        0f,
        new Vector2(size.X * 0.5f, size.Y * 0.5f)
    );
}
this goes after the SpriteFilter loop but before the SpriteBatch.End call.
let's create a couple new messages:
public readonly record struct StartGame();
public readonly record struct OpenMenu();
now let's create a Menu system:
using System;
using Microsoft.Xna.Framework;
using MoonTools.ECS;
using ShmupTutorial.Components;
using ShmupTutorial.Data;
using ShmupTutorial.Messages;

namespace ShmupTutorial.Systems;

public class Menu : MoonTools.ECS.System
{

    Filter MenuFilter;
    public Menu(World world) : base(world)
    {
        MenuFilter = FilterBuilder.Include<Text>().Build();
    }

    public override void Update(TimeSpan delta)
    {
        if (SomeMessage<OpenMenu>())
        {
            var prompt = CreateEntity();
            Set(prompt, new Text(TextStorage.GetID("press shoot to start")));
            Set(prompt, new Position(new Vector2(ShmupTutorial.RenderWidth * 0.5f, ShmupTutorial.RenderHeight * 0.5f)));
        }

        foreach (var message in ReadMessages<InputAction>())
        {
            if (
            !Some<CanBeControlled>()
            && message.Action == Actions.Shoot
            && message.State == ActionState.Pressed
            )
            {
                Send(new StartGame());
                foreach (var entity in MenuFilter.Entities)
                    Set(entity, new MarkedForDestroy());
            }
        }
    }
}
the idea here is that whenever this sees an OpenMenu message, it'll open the menu, which consists of one line of text ("press shoot to start"). when the menu sees an InputMessage that corresponds to Shoot, it'll start the game. we also check the State to make sure it's Pressed and not Held so that in the (likely) case you are holding Shoot when you die, you don't get immediatley launched back into another game.
a note about strings
i'm embedding the string directly in the source code for simplicity's sake here, but in a real video game you never want to do this. strings should be stored in a external text file like JSON, CSV, or XML, and parsed by the game. this is related to the principle of avoiding "magic numbers," but for strings it's mainly important for internationalization reasons. if you only refer to the strings indirectly with variable names or array indices or something like that, you can easily swap out the set of strings for one language with another. internationalization is a very deep topic, and this only scratches the surface, definitely read about it in detail if you want to make a game, especially one with a lot of text.now, in the Player system, replace
if(!Some<CanBeControlled>())
with
if (SomeMessage<StartGame>())
and in ProjectName.cs put
World.Send(new OpenMenu());
at the bottom of LoadContent, after all the bounds get created but before base.LoadContent() is called.
we still need that null check, though, so move it to after the if (SomeMessage<StartGame>()) block:
}

if (!Some<CanBeControlled>())
    return;

var player = GetSingletonEntity<CanBeControlled>();
if you run the game now, you should see some text, and then be able to push space and get into the game.
xi. player damage and death
ok, let's finally put a CanTakeDamage component on the player:
Set(player, new CanTakeDamage(3));
now, in our Destroyer add the following:
foreach (var entity in DestroyFilter.Entities)
{
    foreach (var collider in OutRelations<HasCollider>(entity))
        Destroy(collider);

    if (Has<CanBeControlled>(entity)) //NEW
        Send(new OpenMenu()); //NEW

    Destroy(entity);
}
this will automatically open the menu as soon as the player destroyed.
also, in the Enemy system:
public override void Update(TimeSpan delta)
{
    if (SomeMessage<StartGame>())
    {
        foreach (var enemy in EnemyFilter.Entities)
        {
            Set(enemy, new MarkedForDestroy());
        }
    }

    while (Some<CanBeControlled>() && EnemyFilter.Count < 5)
    {
when the player starts the game again, all existing entities will be destroyed, and no new entities will be spawned if there isn't a player. this is why we changed the player filter's access modifier, by the way.
if you run the game now, you may immediately notice a problem:

we have 3 hp, but we seem to die immediately. this is because there's no I-frames, so the enemy just does damage to us every frame until we die. we can solve this with a new component:
public readonly record struct BecomeInvincibleOnDamage(float Time);
Set(player, new BecomeInvincibleOnDamage(1f));
and a new relation:
public readonly record struct Invincible();
now, in the Health system:
foreach (var entity in DamageFilter.Entities)
{
    if (HasInRelation<Invincible>(entity))
    {
        continue;
    }

    var hp = Get<CanTakeDamage>(entity).HP;
    foreach (var message in ReadMessagesWithEntity<Damage>(entity))
    {
        hp -= 1;

        if (Has<BecomeInvincibleOnDamage>(entity))
        {
            var timer = CreateEntity();
            Set(timer, new Timer(Get<BecomeInvincibleOnDamage>(entity).Time));
            Relate(timer, entity, new Invincible());
        }
    }

    if (hp <= 0)
    {
        Set(entity, new MarkedForDestroy());
    }

    Set(entity, new CanTakeDamage(hp));


}
we can use the Time system we created earlier plus our new Invincible relation to make it so an entity can be invincible for a period of time.
if you run the game now, it works a bit better:
it's still not right though. in most shmups, once you hit an enemy, you can't collide with enemies for the period of your invincibility.
this can be solved pretty easily in the Player system:
if (HasInRelation<Invincible>(player))
{
    var collider = OutRelationSingleton<HasCollider>(player);
    var aabb = Get<AABB>(collider);
    Set(collider, new Layer(CollisionLayer.Pickup | CollisionLayer.Level));
}
else
{
    var collider = OutRelationSingleton<HasCollider>(player);
    var aabb = Get<AABB>(collider);
    Set(collider, new Layer(CollisionLayer.PlayerActor));
}
we only want to collide with powerups (which we haven't added yet) and the level bounds while we're invincible, so let's make those the only layers the player is on.
xii. scoring and HUD
there's a few more basics we need to add.
first, there's no way for us to keep track of how well we're doing. it would also be nice to have a HUD that indicates how many lives you have.
scoring
we need a new component:
public readonly record struct Score(int Current, int High);
and a new message:
public readonly record struct AddScore(int Add);
now we can use these in a new system, Score:
using System;
using System.ComponentModel;
using Microsoft.Xna.Framework;
using MoonTools.ECS;
using ShmupTutorial.Components;
using ShmupTutorial.Data;
using ShmupTutorial.Messages;

namespace ShmupTutorial.Systems;

public class Score : MoonTools.ECS.System
{
    public Score(World world) : base(world)
    {
    }

    public override void Update(TimeSpan delta)
    {
        if (!Some<Components.Score>())
        {
            var entity = CreateEntity();
            Set(entity, new Components.Score(0, 0));
            Set(entity, new Text(TextStorage.GetID("0 (best: 0)")));
            Set(entity, new Position(new Vector2(ShmupTutorial.RenderWidth * 0.5f, 8f)));
            return;
        }

        var scoreEntity = GetSingletonEntity<Components.Score>();
        var score = Get<Components.Score>(scoreEntity);

        if (SomeMessage<StartGame>())
            Set(scoreEntity, new Components.Score(0, score.High));

        foreach (var msg in ReadMessages<AddScore>())
        {
            var s = score.Current + msg.Add;
            if (s > score.High)
                Set(scoreEntity, new Components.Score(s, s));
            else
                Set(scoreEntity, new Components.Score(s, score.High));
        }

        Set(scoreEntity, new Text(TextStorage.GetID(string.Format("{0} (best: {1})", score.Current, score.High))));
    }
}
first, we create the Score entity if it doesn't exist, which includes the Textcomponent.
then, if the player has started the game, we have to reset the Current field but not the High field.
and finally, we go through all the AddScore messages and add them to the Score component. if the new Current score is better than the High score, we overwrite the High score.
we can use this system by sending messages from the Health system:
if (hp <= 0)
{
    Set(entity, new MarkedForDestroy());

    if (!Has<CanBeControlled>(entity))
        Send(new AddScore(1));
}
if it's not the player and it dies, add to the score.
don't forget to set it up in ProjectName.cs:
Systems.Score Score;

(...)

Score = new Systems.Score(World);

protected override void Update(GameTime gameTime)
{
    Destroyer.Update(gameTime.ElapsedGameTime);
    Time.Update(gameTime.ElapsedGameTime);
    Input.Update(gameTime.ElapsedGameTime);
    Menu.Update(gameTime.ElapsedGameTime);
    Player.Update(gameTime.ElapsedGameTime);
    Enemy.Update(gameTime.ElapsedGameTime);
    Bullet.Update(gameTime.ElapsedGameTime);
    Motion.Update(gameTime.ElapsedGameTime);
    Collision.Update(gameTime.ElapsedGameTime);
    Health.Update(gameTime.ElapsedGameTime);
    Score.Update(gameTime.ElapsedGameTime);
    World.FinishUpdate();
    base.Update(gameTime);
}
and in Menu.cs, we need to make a small adjustment to our MenuFilter:
Filter MenuFilter;
public Menu(World world) : base(world)
{
    MenuFilter = FilterBuilder
    .Include<Text>()
    .Exclude<Components.Score>()
    .Build();
}
lives
rather than a simple number, let's make a more traditional life display that uses sprites to show you how many lives you have. this is trickier than it sounds, because unlike everything else we've seen so far, the lives have an order. when we remove lives, we need to always remove the last life, instead of the life in the middle or something.
there are lots of ways of doing this in ECS, but one of the most flexible is to use entity relations to create a linked list.
what's a linked list?
a linked list is a kind of data structure. it's a list, which means that unlike an array it can store a flexible number of items that doesn't need to be specified ahead of time.a linked list works by having each element in the list hold a reference to the next (and sometimes previous) element in the list.
if you think about this in terms of ECS entity relations, you can imagine entity A being related to entity B which is related to entity C. if you have entity A, you can get to entity C by following the chain of relations.
entity relations are bidirectional, so our linked list is "doubly linked" by default. this means that with any one element, we can always get to all the other elements by following the relations in some direction.
i want to take a moment to emphasize a point here: in general, when using ECS, if you can find a way to store a data structure in the ECS itself, you will almost certainly benefit from it. we could store the lives in an array or list outside the ECS, but storing them in the ECS is almost certainly better.
first, create a new relation:
public readonly record struct HasLife();
now, in our Player system:
int StartingHealth = 3;

(...)

if (SomeMessage<StartGame>())
{
    var entity = CreateEntity();
    var sprite = Content.Textures.Player;

    var collider = CreateEntity();
    Set(collider, new AABB(0f, 0f, 8f, 8f));
    Set(collider, new Layer(CollisionLayer.PlayerActor));

    Set(entity, new Sprite(sprite, 0.0f));
    Set(entity, new Position(new Vector2(ShmupTutorial.RenderWidth * 0.5f, ShmupTutorial.RenderHeight * 0.5f)));
    Set(entity, new CanBeControlled());
    Set(entity, new CanMove(128.0f));
    Set(entity, new CanShoot(0.1f));
    Set(entity, new CanTakeDamage(StartingHealth));
    Set(entity, new BecomeInvincibleOnDamage(1f));
    Relate(entity, collider, new HasCollider());

    //NEW
    var prev = entity;
    for (int i = 0; i < StartingHealth; i++)
    {
        var next = CreateEntity();
        Set(next, new Sprite(sprite, 0.0f));
        Set(next, new Position(
            new Vector2((i + 1) * (sprite.Width + 2.0f), ShmupTutorial.RenderHeight - sprite.Height)
        ));
        Relate(prev, next, new HasLife());
        prev = next;
    }
}
this is going to create one new sprite for each health we have. they're being positioned in the bottom left of the screen with a margin between sprites of 2. i've also moved the health to a configuration variable at the top of the class. each life is related to the previous life by the HasLife relation.
now, in the HealthSystem
foreach (var message in ReadMessagesWithEntity<Damage>(entity))
{
    hp -= 1;

    if (Has<BecomeInvincibleOnDamage>(entity))
    {
        var timer = CreateEntity();
        var invincible = Get<BecomeInvincibleOnDamage>(entity);
        Set(timer, new Timer(invincible.Time));
        Relate(timer, entity, new Invincible());
    }

    //NEW
    if (Has<CanBeControlled>(entity))
    {
        var life = entity;
        while (HasOutRelation<HasLife>(life))
        {
            life = OutRelationSingleton<HasLife>(life);
        }
        if (!Has<CanBeControlled>(life))
            Destroy(life);
    }
}
now, we can walk through the linked list by starting at the player and continuing until we find a sprite that has no HasLife out relation. once we do this, we can destroy it.
xiv. polish and visual effects
our game has a technically complete loop now, but it's missing a lot. the game doesn't feel very good to play, and there's a lot of information it doesn't convey. for instance, it's hard to tell when you're invincible. shmups usually communicate this by making the player sprite flicker. also, there's no feedback when you deal damage. we can solve this with flicker as well. it would also be nice if there were some particles that spawned when we hit things and when enemies were destroyed. another common "game feel" element in action games is screen shake. we can shake the screen when you hit and destroy enemies to add impact to those moments.
in this section, we'll explore how we can use some of the techniques we've already seen to add polish and flair to our project.
flicker
flicker is fairly straightforward, and should be easy with our timer system. we really need two timers here: one that times how long the flicker effect will last, and one that times how long each individual flicker will be. be careful with flicker effects, very fast flickers and flickers that take up a large portion of the screen can cause headaches, eyestrain, and seizures for some people.
create two new relations:
public readonly record struct Flickering(float Time);
public readonly record struct Flicker();
a new message:
public readonly record struct StartFlickering(float TotalTime, float FlickerTime);
a new component:
public readonly record struct Invisible();
and finally a new system, Flicker.cs:
using System;
using MoonTools.ECS;
using ShmupTutorial.Components;
using ShmupTutorial.Messages;
using ShmupTutorial.Relations;

namespace ShmupTutorial.Systems;

public class Flicker : MoonTools.ECS.System
{
    public Filter SpriteFilter;

    public Flicker(World world) : base(world)
    {
        SpriteFilter = FilterBuilder
                        .Include<Sprite>()
                        .Include<Position>()
                        .Build();
    }

    public override void Update(TimeSpan delta)
    {
        foreach (var entity in SpriteFilter.Entities)
        {
            if (HasOutRelation<Flickering>(entity))
            {
                var flickeringTimerEntity = OutRelationSingleton<Flickering>(entity);
                var flickeringTimer = Get<Timer>(flickeringTimerEntity);
                var flickering = GetRelationData<Flickering>(entity, flickeringTimerEntity);

                if (SomeMessageWithEntity<StartFlickering>(entity))
                {
                    var msg = ReadMessageWithEntity<StartFlickering>(entity);
                    Set(flickeringTimerEntity, new Timer(flickeringTimer.Time + msg.TotalTime));
                    Relate(entity, flickeringTimerEntity, new Flickering());
                }

                if (HasOutRelation<Relations.Flicker>(entity))
                {
                    var timer = OutRelationSingleton<Relations.Flicker>(entity);
                    var time = Get<Timer>(timer);
                    if (time.Time > time.Max * 0.5f)
                        Set(entity, new Invisible());
                    else
                        Remove<Invisible>(entity);
                }
                else
                {
                    var timer = CreateEntity();
                    Set(timer, new Timer(flickering.Time));
                    Relate(entity, timer, new Relations.Flicker());
                }
            }
            else if (SomeMessageWithEntity<StartFlickering>(entity))
            {
                var flickering = ReadMessageWithEntity<StartFlickering>(entity);
                var timer = CreateEntity();
                Set(timer, new Timer(flickering.TotalTime));
                Relate(entity, timer, new Flickering(flickering.FlickerTime));
            }
            else
            {
                Remove<Invisible>(entity);
            }
        }
    }
}
this might take a second to wrap your head around. Flickering is the timer that determines how long the flickering effect will last. Flicker (which we have to specify as Relations.Flicker for disambiguation purposes) is the timer for each individual on/off cycle of the flickering effect. if the entity has a Flickering timer on it, we first check and see if new StartFlickering messages have come in. if they have, we add their time to the total flicker time and change the flickering rate to the new rate.
if the entity has a Flicker timer we check if the timer is in the top half or the bottom half of the total cycle time. if it's in the top half, we set it to be Invisible, otherwise we remove the Invisible. if the entity's Flicker timer has run out but it's still Flickering, we create a new Flicker timer.
finally, we handle the case of starting a flicker for an entity that is not currently flickering, which is just creating and attaching a timer. we also handle the case of no flickering and make sure to Remove the Invisible component.
we need to update the SpriteRenderer to use our Invisible component, but this is easy:
foreach (var entity in SpriteFilter.Entities)
{
    if (Has<Invisible>(entity))
        continue;
just skip the rendering if the entity is invisible.
and now we can put some StartFlickering messages in the Health system:
foreach (var message in ReadMessagesWithEntity<Damage>(entity))
{
    hp -= 1;

    if (Has<BecomeInvincibleOnDamage>(entity))
    {
        var timer = CreateEntity();
        var invincible = Get<BecomeInvincibleOnDamage>(entity);
        Set(timer, new Timer(invincible.Time));
        Relate(timer, entity, new Invincible());
        Send(entity, new StartFlickering(invincible.Time, 0.1f));
    }
    else
    {
        Send(entity, new StartFlickering(0.1f, 4.0f / 60.0f));
    }
}
we want the player to flicker for as long as they're invincible. the enemies should flicker for a shorter time, and faster, because they don't get i-frames.
don't forget to add the system to ProjectName.cs:
Systems.Flicker Flicker;

(...)

Flicker = new Systems.Flicker(World);

(...)

protected override void Update(GameTime gameTime)
{
    Destroyer.Update(gameTime.ElapsedGameTime);
    Time.Update(gameTime.ElapsedGameTime);
    Input.Update(gameTime.ElapsedGameTime);
    Menu.Update(gameTime.ElapsedGameTime);
    Player.Update(gameTime.ElapsedGameTime);
    Enemy.Update(gameTime.ElapsedGameTime);
    Bullet.Update(gameTime.ElapsedGameTime);
    Motion.Update(gameTime.ElapsedGameTime);
    Collision.Update(gameTime.ElapsedGameTime);
    Health.Update(gameTime.ElapsedGameTime);
    Flicker.Update(gameTime.ElapsedGameTime);
    World.FinishUpdate();
    base.Update(gameTime);
}
particles
"particles" is the visual effects term of art for an effect that relies on spawning large numbers of small objects and animating them. lots of game engines have particle systems, as do many visual effects programs like adobe after effects. particles are a great way to add some polish and make your game feel better to play. it doesn't make sense that when we destroy enemies they just disappear! we want them to explode into tiny pieces.
in actor model engines you often have to do all manner of tricks to make spawning large numbers of particles performant. in ECS, you can just spawn them like any other entity, no special tricks required. this makes particles much easier to work with.
we're going to be just spawning a clump of particles and evolving them based on some parameters. you can also use particles for continuous effects, like smoke and fire, the foam at the base of a waterfall, or all manner of magical or sci-fi sparkles emanating from powerful objects.
the first thing we need to do is create the most complicated message yet:
public readonly record struct SpawnParticles(
    Rectangle Sprite,
    Vector2 Position,
    int MinParticles,
    int MaxParticles,
    float MinVelocity = 1.0f,
    float MaxVelocity = 1.0f,
    float MinLifetime = 1.0f,
    float MaxLifetime = 1.0f,
    float MinStartSize = 1.0f,
    float MaxStartSize = 1.0f,
    float MinEndSize = 1.0f,
    float MaxEndSize = 1.0f
    );
you generally don't want particles to just stick around, you want them to do stuff. we therefore need a lot of parameters to set how the particles are going to evolve over time. our particles are going to be spawned as a single group and then evolve from there, so we can just send a message to the Particles system.
we also need a component:
public readonly record struct ChangeSize(
    float StartSize,
    float EndSize
);
now let's use these in a Particle system:
using System;
using Microsoft.Xna.Framework;
using MoonTools.ECS;
using ShmupTutorial.Components;
using ShmupTutorial.Messages;
using ShmupTutorial.Utility;

namespace ShmupTutorial.Systems;

public class Particles : MoonTools.ECS.System
{
    public Filter ChangeSizeFilter;

    public Particles(World world) : base(world)
    {
        ChangeSizeFilter = FilterBuilder
                        .Include<Timer>()
                        .Include<ChangeSize>()
                        .Build();
    }

    public override void Update(TimeSpan delta)
    {
        foreach (var message in ReadMessages<SpawnParticles>())
        {
            var numParticles = Rando.IntInclusive(message.MinParticles, message.MaxParticles);
            for (int i = 0; i < numParticles; i++)
            {
                var lifetime = Rando.Range(message.MinLifetime, message.MaxLifetime);
                var startSize = Rando.Range(message.MinStartSize, message.MaxStartSize);
                var particle = CreateEntity();
                Set(particle, new ChangeSize(
                    startSize,
                    Rando.Range(message.MinEndSize, message.MaxEndSize)
                ));
                Set(particle, new CanMove(Rando.Range(message.MinVelocity, message.MaxVelocity)));
                Set(particle, new Direction(Rando.OnUnitCircle()));
                Set(particle, new Timer(lifetime));
                Set(particle, new Sprite(message.Sprite, 1.0f));
                Set(particle, new Scale(Vector2.One * startSize));
                Set(particle, new Position(message.Position));
            }
        }

        foreach (var entity in ChangeSizeFilter.Entities)
        {
            var size = Get<ChangeSize>(entity);
            var timer = Get<Timer>(entity);
            var t = 1.0f - timer.Remaining;
            Set(entity, new Scale(Vector2.One * MathHelper.Lerp(size.StartSize, size.EndSize, t)));
        }
    }
}
this file is long but it's not doing a ton. this pattern should be familiar to you. one small thing is that we're attaching a Timer directly to the particle rather than using a relationship. Timers are destroyed at the end of their life anyway, which is exactly the behavior we want. besides that, almost everything can be done with components we already have.
we also see heavy use of my Rando class, including the Rando.OnUnitCircle method. you can't just generate random X and Y coordintes between 0 and 1, because that won't form a cirlce, and you can't just normalize that because the distribution won't be uniform. you have to generate polar coordinates and then convert to cartesian to get a uniform distribution around a circle or sphere. check the implementation in the Rando class for the details.
the last bit is animating the size change. we want the particles to shrink as their lifetime ticks down, so they don't just blink out of existence. it looks nice. this is where we finally use that Remaining property we built ages ago.
what's MathHelper.Lerp?
`Lerp` is short for "linear interpolation," which basically means we give it a start value and an end value and it will calculate in between values when we give it a number between 0 and 1. to get that number, we divide the time remaining (timer.Time) by the total time (size.Time). this however is the reverse of what we want, it goes from 1 to 0 as the time runs out. we can fix this easily by subtracting the result from our max value, 1.0.
you can experiment with using other interpolation functions besides Lerp. see a bunch of examples at easings.net, and there's a moontools library that implements all of those called MoonTools.Easing.
now, if you can spawn some particles when entities are killed in the Health system:
if (hp <= 0)
{
    Set(entity, new MarkedForDestroy());

    var sprite = Get<Sprite>(entity).Rect;
    var position = Get<Position>(entity).Value;
    Send(new SpawnParticles(
        sprite,
        position,
        5, 10,
        8.0f, 256.0f,
        0.1f, 2.0f,
        0.3f, 0.5f,
        0f, 0.2f
    ));
screen shake
for this, let's start by moving our render target shenanigans into the SpriteRenderer:
RenderTarget2D RenderTarget;
GraphicsDevice GraphicsDevice;
GameWindow Window;


public SpriteRenderer(World world,
    SpriteBatch spriteBatch,
    GraphicsDevice graphicsDevice,
    RenderTarget2D renderTarget,
    GameWindow window
) : base(world)
{
    SpriteBatch = spriteBatch;
    SpriteFilter = FilterBuilder
        .Include<Position>()
        .Include<Sprite>()
        .Build();

    TextFilter = FilterBuilder
    .Include<Position>()
    .Include<Text>()
    .Build();

    RenderTarget = renderTarget;
    GraphicsDevice = graphicsDevice;
    Window = window;

    Font = Content.Fonts.Opensans.GetFont(16);
}

public void Draw()
{
    GraphicsDevice.SetRenderTarget(RenderTarget);

    GraphicsDevice.Clear(Color.Black);

    SpriteBatch.Begin(
        SpriteSortMode.BackToFront,
        BlendState.AlphaBlend,
        SamplerState.PointClamp,
        DepthStencilState.None,
        RasterizerState.CullCounterClockwise
    );

//(drawing code...)

    SpriteBatch.End();

    GraphicsDevice.SetRenderTarget(null);
    GraphicsDevice.Clear(Color.Black);
    SpriteBatch.Begin(
        SpriteSortMode.Deferred,
        BlendState.Opaque,
        SamplerState.PointClamp,
        DepthStencilState.None,
        RasterizerState.CullCounterClockwise
    );

    var height = Window.ClientBounds.Height;
    height -= height % ShmupTutorial.RenderHeight;
    var width = (int)MathF.Floor(height * ShmupTutorial.AspectRatio);
    var wDiff = Window.ClientBounds.Width - width;
    var hDiff = Window.ClientBounds.Height - height;

    SpriteBatch.Draw(
        RenderTarget,
        new Rectangle(
            (int)MathF.Floor(wDiff * 0.5f),
            (int)MathF.Floor(hDiff * 0.5f),
            width,
            height),
        null,
        Color.White
    );
    SpriteBatch.End();
now we dependency inject all the graphics objects, so update the constructor in ProjectName.cs:
SpriteRenderer = new SpriteRenderer(World, SpriteBatch, GraphicsDevice, RenderTarget, Window);
now let's create a new component:
public readonly record struct ShakeScreen(float Magnitude);
now, in our renderer:
Filter ShakeFilter;

(...)


ShakeFilter = FilterBuilder
.Include<ShakeScreen>()
.Include<Timer>()
.Build();

(...)

var shake = 0.0f;
foreach (var screenshake in ShakeFilter.Entities)
{
    var timer = Get<Timer>(screenshake);
    var shaker = Get<ShakeScreen>(screenshake);
    shake += shaker.Magnitude * (timer.Time / timer.Max);
}


var shakeDirection = Rando.InsideUnitSphere() * shake;

SpriteBatch.Draw(
    RenderTarget,
    new Rectangle(
        (int)(MathF.Floor(wDiff * 0.5f) + shakeDirection.X),
        (int)(MathF.Floor(hDiff * 0.5f) + shakeDirection.Y),
        width,
        height),
    null,
    Color.White
);
this will sum the magnitude of all the shake events currently happening and calculate shake based on all of them. we multiply by the linear interpolation factor we calculated before to have the shakes decrease in severity as the shake goes on.
now let's add some shake to the Health system:
if (Has<CanBeControlled>(entity))
{
    var life = entity;
    while (HasOutRelation<HasLife>(life))
    {
        life = OutRelationSingleton<HasLife>(life);
    }
    if (!Has<CanBeControlled>(life))
    {
        Destroy(life);
    }

    var shaker = CreateEntity();
    Set(shaker, new ShakeScreen(4.0f));
    Set(shaker, new Timer(0.3f));
}

(...)

if (hp <= 0)
{
    Set(entity, new MarkedForDestroy());

    var sprite = Get<Sprite>(entity).Rect;
    var position = Get<Position>(entity).Value;
    Send(new SpawnParticles(
        sprite,
        position,
        5, 10,
        8.0f, 256.0f,
        0.1f, 2.0f,
        0.3f, 0.5f,
        0f, 0.2f
    ));

    if (!Has<CanBeControlled>(entity))
    {
        Send(new AddScore(1));
        var shaker = CreateEntity();
        Set(shaker, new ShakeScreen(4.0f));
        Set(shaker, new Timer(0.1f));
    }
    else
    {
        var shaker = CreateEntity();
        Set(shaker, new ShakeScreen(8.0f));
        Set(shaker, new Timer(0.5f));
    }
}
xv. sound
you can probably figure this one out on your own at this point, but i figured i'd cover how to incorporate sound effects into your game.
in the assets pack, i included a few sound effects, so they should be in your Content.cs folder.
sound effects are classes so we can't just store them in messages and components. time to create a new storage class.
using System.Collections.Generic;
using Microsoft.Xna.Framework.Audio;

namespace ShmupTutorial.Data
{
    public static class SoundStorage
    {
        static Dictionary<SoundEffect, int> SoundEffectToID = new Dictionary<SoundEffect, int>();
        static SoundEffect[] IDToSoundEffect = new SoundEffect[256];
        static Stack<int> OpenIDs = new Stack<int>();
        static int NextID = 0;

        public static SoundEffect GetSoundEffect(int id)
        {
            return IDToSoundEffect[id];
        }

        public static int GetID(SoundEffect text)
        {
            if (!SoundEffectToID.ContainsKey(text))
            {
                RegisterSoundEffect(text);
            }

            return SoundEffectToID[text];
        }

        private static void RegisterSoundEffect(SoundEffect text)
        {
            if (OpenIDs.Count == 0)
            {
                if (NextID >= IDToSoundEffect.Length)
                {
                    System.Array.Resize(ref IDToSoundEffect, IDToSoundEffect.Length * 2);
                }
                SoundEffectToID[text] = NextID;
                IDToSoundEffect[NextID] = text;
                NextID += 1;
            }
            else
            {
                SoundEffectToID[text] = OpenIDs.Pop();
            }
        }
    }
}
note that this is literally the same class as TextStorage.cs but with string replaced by SoundEffect.
now we need a new message:
public readonly record struct PlaySound(int ID);
and a system to process them:
using System;
using System.Numerics;
using MoonTools.ECS;
using ShmupTutorial.Components;
using ShmupTutorial.Data;
using ShmupTutorial.Messages;
using ShmupTutorial.Relations;

namespace ShmupTutorial.Systems;

public class Sound : MoonTools.ECS.System
{
    public Sound(World world) : base(world)
    {
    }

    public override void Update(TimeSpan delta)
    {
        foreach (var message in ReadMessages<PlaySound>())
        {
            var sound = SoundStorage.GetSoundEffect(message.ID);
            sound.Play();
        }
    }
}
now we can send these messages in various places, like whenever a bullet is shot in the Bullet system:
if (Has<CanShoot>(message.Source) && !HasInRelation<DisableShoot>(message.Source))
{
    Send(new PlaySound(SoundStorage.GetID(Content.SFX.Shoot)));
when the player takes damage in the Health system:
if (Has<CanBeControlled>(entity))
{
    if (hp > 0)
        Send(new PlaySound(SoundStorage.GetID(Content.SFX.Hit)));
and similarly when the player or enemy dies:
if (!Has<CanBeControlled>(entity))
{
    Send(new PlaySound(SoundStorage.GetID(SFX.Enemydeath)));
    Send(new AddScore(1));
    var shaker = CreateEntity();
    Set(shaker, new ShakeScreen(4.0f));
    Set(shaker, new Timer(0.1f));
}
else
{
    Send(new PlaySound(SoundStorage.GetID(SFX.Death)));
    var shaker = CreateEntity();
    Set(shaker, new ShakeScreen(8.0f));
    Set(shaker, new Timer(0.5f));
}
if you run the game now, there will be sound! it might be loud, so be careful to turn your volume down before you make any noises.
i made all these sounds with bfxr, a free sound effects generator. make some of your own and fill your games with sound!
xvi: conclusion
so that's the whole game. it's still not very good! for one, the art is terrible (i'll take responsibility for that). but there's not a lot going on. if you want, try to imagine improvements you could make and see if you can implement them. i hope to do a follow-up to this tutorial to cover some more things you could add to this game: more types of enemies, enemies that shoot bullets, boss fights, and more.
there's also lots more i didn't cover, in particular user interface things. in the near future i am planning a tutorial similar to this one where we make a visual novel, and in that tutorial i will dive deep into how to make a pleasing user interface, as well as how to handle things like mouse input.
and, once again, if you find this tutorial valuable, i have a patreon and a ko-fi. your support is much appreciated.